Kubernetes API
Let’s see how to play K8s in MacOs using MniKube. Some of the topics are very basic such as How to create a namespace and pod in it. Shelling to the pod and after delete pod and the namespace. However, this is written to address the concepts such as configMap, secrets, resource sharing and Helm charts.
- Minikube
- Create namespace and pod
- Interacting with pod
- Delete resources
- ConfigMaps
- Secrets
- Security Context
- Resource Sharing
- Service Account
- Helm
- Chart
Minikube
Find the latest support Minikube supported Kubernetes version from here, and you can start the Minikube as follows
minikube start --cpus=2 --memory=4000 --kubernetes-version=v1.23.3
you can find component status:
kubectl get componentstatus

Display the nodes
kubectl get nodes

Find the cluster information:
kubectl cluster-info
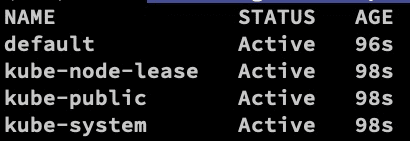
The above command will create a default namespace.
kubectl get namespaces
Login to the docker instance of Minikube
minikube ssh
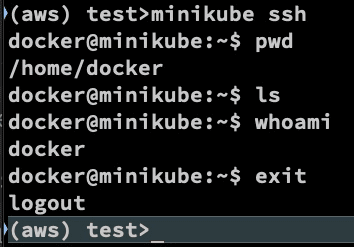
You can get the IP address of the docker instance using minikube ip.
Create namespace and pod
To create a new namespace:
kubectl create namespace <namespace>
To list the namespaces available.
kubectl get namespaces
Create POD
kubectl run <pod-name> --image=nginx:2.3.5 --restart=Never --port=80 --namespace=<namespace>
Or simply kubectl run ghost --image=ghost:0.9 -n testns.
List all the pods in the namespace.
kubectl get pod -n <namespace>
for example kubectl get pods -n testns:

To update the pod image.
kubectl set image pod <pod-name> mypod=nginx --namespace=<namespace>
The above command will use the latest version of the nginx.
Check the latest status of the pod:
kubectl get pod -n <namespace>
Interacting with pod
Shelling to the pod
kubectl exec <pod-name> -it --namespace=<namespace> -- /bin/sh
Accessing pod logs:
kubectl logs <pod-name> -n <namespace>
You can create the pod from a yaml file.
Before going further delete the existing pod in the testns namespace:
kubectl delete pod ghost -n testns
Create pod.yaml using the following command:
kubectl run ghost --image=ghost:0.9 -n testns -o yaml --dry-run=client > pod.yaml
The above command will create the pod.yaml
apiVersion: v1
kind: Pod
metadata:
  creationTimestamp: null
  labels:
    run: ghost
  name: ghost
  namespace: testns
spec:
  containers:
  - image: ghost:0.9
    name: ghost
    resources: {}
  dnsPolicy: ClusterFirst
  restartPolicy: Always
status: {}
Now deploy from the above pod.yaml
kubectl apply -f pod.yaml
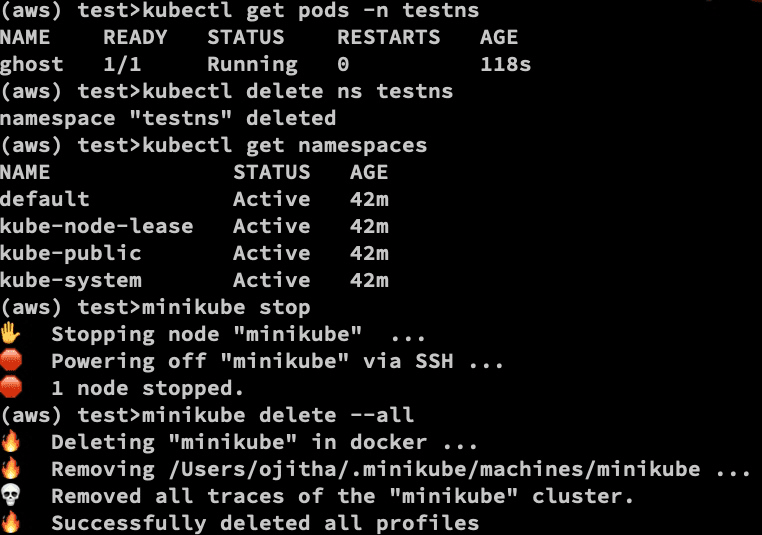
If you list using kubectl get pods -n testns, you will find the ghost pod.
Delete resources
Delete the pod
kubectl delete pod <pod-name> --namespace=<namespace>
delete the namespace
kubectl delete namespace <namespace>
For example, kubectl delete ns testns.
Verify resources are delete
kubectl get pod, namespace
To delete Minikube
minikube stop
minikube delete --all
ConfigMaps
ConfigMaps decouple the configuration values needed at runtime from the definition of a Pod.
-
Create a
config.txtfile with the key-value pairs for each line to have one key-value pair. -
create configmap, for example,
db-configmap:kubectl create configmap db-config --from-env-file=config.txt -
verify the config files are created
kubectl get configmapsOr YAML
kubectl get configmap db-config -o yaml -
Now generate the YAML file for your pod with dry run
kubectl run backend --image=nginx --restart=Never -o yaml --dry-run > pod.yaml -
Add the configMap to that
spec: containers: - image: nginx name: backend envFrom: - configMapRef: name: db-config -
now create the pod
kubectl create -f pod.yaml -
Shell into the pod and verify
kubectl exec backend -it -- /bin/shCheck within the pod bash
env | grep <key pattern>
Secrets
The way to maintain secret information, data should be base64 encoded. Secrets are only in memory and not written to the disk.
- generate the
db-credentials
kubectl create secret generic db-credentials --from-literal=db-password=<password>
- verify
kubectl get secrets
- check the YAML representation
kubectl get secret db-credentials -o yaml
-
Dry run to pod.xml
kubectl run backend --image=nginx --restart=Never -o yaml --dry-run > pod.yaml -
update the pod.xml with
db-credentials:spec: containers: - image: nginx name: backend env: - name: DB_PASSWORD valueFrom: secretKeyRef: name: db-credentials key: db-password -
Now, you can create a pod from the pod.xml file
kubectl create -f pod.yaml -
Verify by shelling to the pod
kubectl exec backend -it -- /bin/shand
env | grep DB_PASSWORD
Security Context
Define access control to a pod or container. Default there is no pod or container security context available.
-
create a pod with a volume
kubectl run secured --image=nginx --restart=Never -o yaml --dry-run > sec.yaml -
Edit the sec.yaml to have
spec: securityContext: fsGroup: 3000 containers: - image: nginx name: secured volumeMounts: - name: data-vol mountPath: /data/app resources: {} volumes: - name: data-vol emptyDir: {} -
create a pod from the above sec.yaml
kubectl create -f sec.yaml -
verify by login to the pod bash
kubectl exec -it secured -- /bin/shchange the directory and create a file, then list the files and see the security group
 cd /data/app
 touch test.txt
 ls -l
Resource Sharing
Resource quotation is bound to the namespace.
-
First, create a namespace
-
Create a YAML file with the resource definition
apiVersion: v1 kind: ResourceQuota metadata: name: app spec: hard: pods: "2" requests.cpu: "2" requests.memory: 500m -
create a quota for the namespace
kubectl create -f <resource-quota>.yaml --namespace=<namespace> -
Describe the quota for the namespace
kubectl describe quota --namespace=<namespace> -
Create pod.xml in the above namespace with dry run
kubectl run <pod-name> --image=nginx --restart=Never -o yaml --dry-run > pod.yaml -
under the resource section in the pod.xml
 apiVersion: v1
 kind: Pod
 metadata:
   creationTimestamp: null
   labels:
     run: testpod
   name: testpod
 spec:
   containers:
   - image: nginx
     name: testpod
     resources:
       requests:
         memory: "200m"
         cpu: "400m"
   dnsPolicy: ClusterFirst
   restartPolicy: Never
 status: {}
If you change the
memory: "1G", you will get an error something similar to:error from server (Forbidden): error when creating "pod.yaml": pods "testpod" is forbidden: exceeded quota: app, requested: requests.memory=1G,...And pod creation will be failed.
-
create a pod in the namespace
kubectl create -f pod.yaml --namespace=<namespace>
Service Account
Pod use a service account to communicate with the cluster API. There is a default service account always.
-
create a service account
kubectl create sa <sa-name>This will create a secret for the service account automatically.
-
inspect the service account
kubectl get serviceaccount <sa-name> -o yaml -
You can find the secret created
kubectl get secretsYou will get something similar to
<sa-name>-token-rg4b8 -
Assigning to the pod
kubectl run <pod-name> --image=nginx --restart=Never --serviceaccount=<sa-name> -
To verify, get into the pod
kubectl exec -it backend -- /bin/shThe same token is available at
cat /var/run/secrets/kubernetes.io/serviceaccount/token
Helm
This is the cluster administration tool for Kubernetes. Charts are source codes for infrastructure as code with the great help of dependency management, which can be packaged, named and under the version management. Charts define a composition of related Kubernetes resources and values that make up a deployment solution.
Install Helm on Mac:
brew install helm
you can verify the installation by running the following command:
helm env
You can find Helm artifact hub for chart repostiories.
search for postgresql in the hub:
helm search hub postgresql
For example, narrow the charts and install
helm search hub redis | grep --color bitnami
the result will be
https://artifacthub.io/packages/helm/bitnami/redis	16.5.2       	6.2.6           	Redis(TM) is an open source, advanced key-value...
https://artifacthub.io/packages/helm/bitnami-ak...	16.5.2       	6.2.6           	Redis(TM) is an open source, advanced key-value...
https://artifacthub.io/packages/helm/bitnami-ak...	7.3.2        	6.2.6           	Redis(TM) is an open source, scalable, distribu...
https://artifacthub.io/packages/helm/bitnami/re...	7.3.2        	6.2.6           	Redis(TM) is an open source, scalable, distribu...
you can add Binami as respository
helm repo add bitnami https://charts.bitnami.com/bitnami
List the repos to verify
helm repo list

The advantage is that you can directly search the repository.
helm search repo bitnami/redis
You will get the following.

For additional information:
helm show chart bitnami/redis
read readme:
helm show readme bitnami/redis
context values:
helm show values bitnami/redis
Create a namespace
kubectl create namespace redis
before installing, create a Redis values YAML file:
replica:
   replicaCount: 2

volumePermissions:
  enabled: true

securityContext:
  enabled: true
  fsGroup: 1001
  runAsUser: 1001
Install the chart
helm install test-redis bitnami/redis --version 16.5.2 --namespace redis --values redis-values.yaml
list the installation:
helm ls -n redis

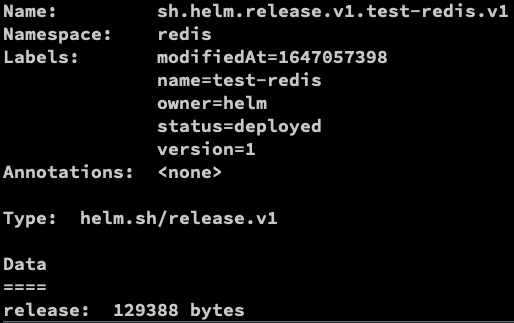
To find the secrets are deployed to the namespace where the chart is deployed.
kubectl get secrets --all-namespaces | grep sh.helm

to read the secret:
kubectl --namespace redis describe secret sh.helm.release.v1.test-redis.v1
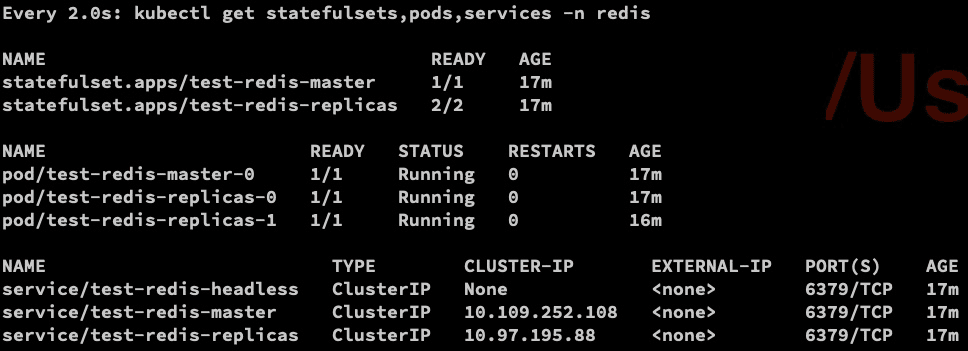
You can use watch command (install on macOS using brew install watch) to find out what was deployed:
watch kubectl get statefulsets,pods,services -n redis
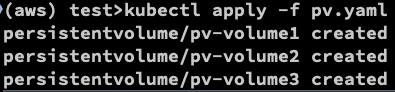
Create persistent volume as specified in the pv.yaml:
kind: PersistentVolume
apiVersion: v1
metadata:
  name: pv-volume1
  labels:
    type: local
spec:
  capacity:
    storage: 10Gi
  accessModes:
    - ReadWriteOnce
  hostPath:
    path: "./data1"
---
kind: PersistentVolume
apiVersion: v1
metadata:
  name: pv-volume2
  labels:
    type: local
spec:
  capacity:
    storage: 10Gi
  accessModes:
    - ReadWriteOnce
  hostPath:
    path: "./data2"
---
kind: PersistentVolume
apiVersion: v1
metadata:
  name: pv-volume3
  labels:
    type: local
spec:
  capacity:
    storage: 10Gi
  accessModes:
    - ReadWriteOnce
  hostPath:
    path: "./data3"
Run the following command to create the above-specified volumes:
kubectl apply -f pv.yaml
ensure Redis has permission to write to these volumes
mkdir ./data1 ./data2 ./data3 --mode=777
To get your password run:
export REDIS_PASSWORD=$(kubectl get secret --namespace redis test-redis -o jsonpath="{.data.redis-password}" | base64 --decode)
kubectl port-forward --namespace redis svc/test-redis-master 6379:6379 > /dev/null &
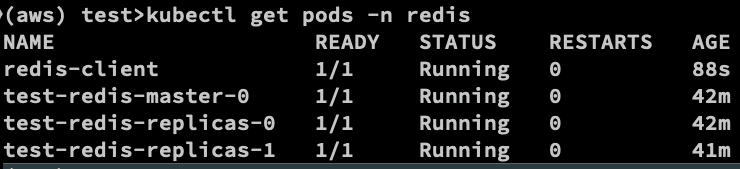
Create a Redis client to access the above-created Redis server
kubectl run --namespace redis redis-client --restart='Never' --env REDIS_PASSWORD=$REDIS_PASSWORD --image docker.io/bitnami/redis:6.2.6-debian-10-r146 --command -- sleep infinity
if you check, you can verify Redis client has been created
use the following command to connect to the Redis client:
kubectl exec --tty -i redis-client --namespace redis -- bash
Inside the client, connect to the
REDISCLI_AUTH="$REDIS_PASSWORD" redis-cli -h test-redis-master
And type the PING. The output should be PONG.

Uninstall Redis
helm delete test-redis -n redis
delete redis client
kubectl delete pod redis-client -n redis
delete redis namespace
kubectl delete namespace redis
Chart
Helm use Go templating API.
Create your chart.
helm create my-chart
to list the skeleton:
tree my-chart
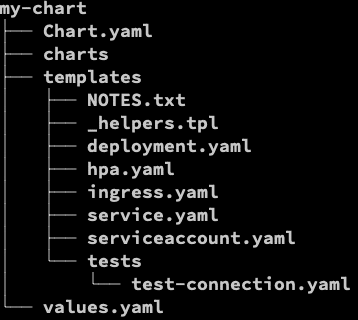
Resource definition is in the template directory:
cat my-chart/templates/deployment.yaml | grep -color 'kind:' -n -B1 -A5

Injected container image for deployment
cat my-chart/templates/deployment.yaml | grep --color 'image:' -n -C3

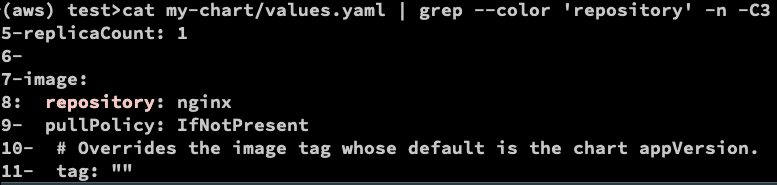
for the above container image is injected to the { { .Values.image.repository } } from the values.yaml as shown in the below:
cat my-chart/values.yaml | grep --color 'repository' -n -C3
Let’s try dry run:
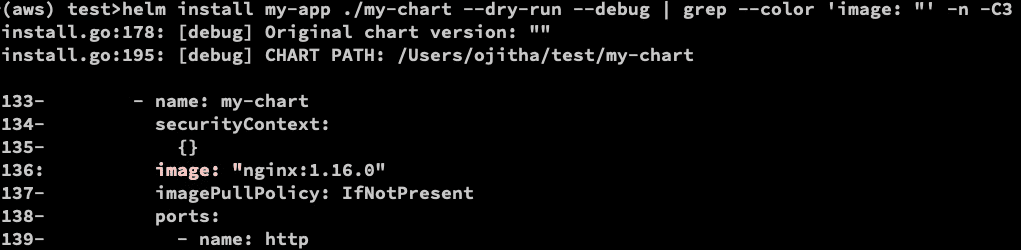
helm install my-app ./my-chart --dry-run --debug | grep --color 'image: "' -n -C3
You can override the default.
helm install my-app ./my-chart --dry-run --debug --set image.pullPolicy=Always | grep --color 'image: "' -n -C3
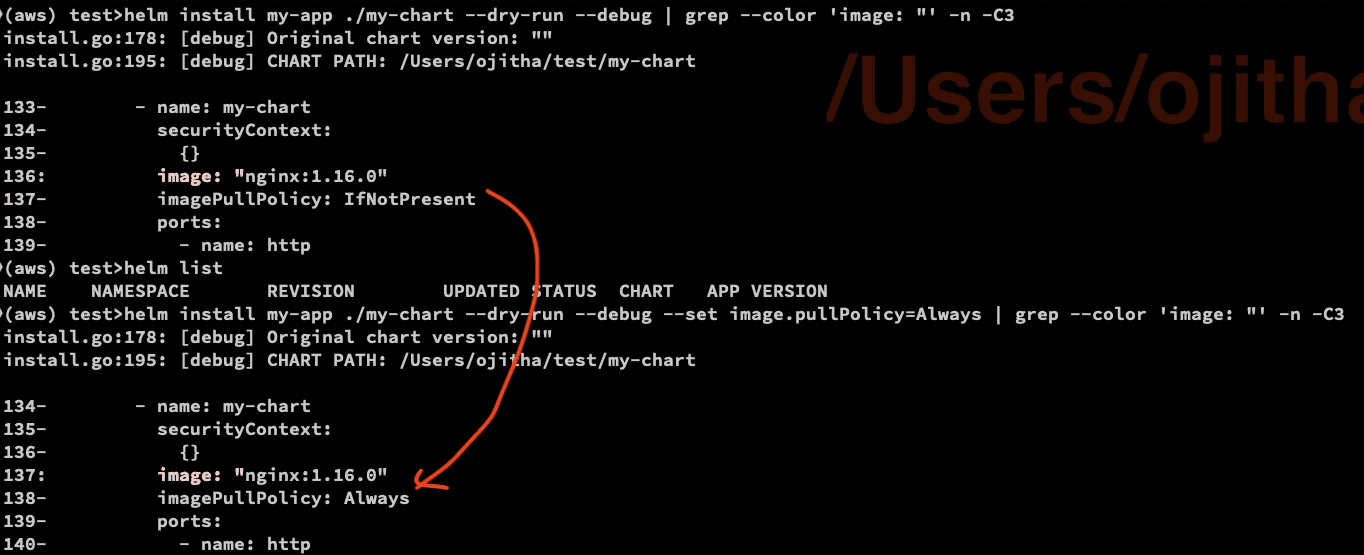
after the dry run investigate, as shown in the above screenshot, install the version change
helm install my-app ./my-chart --set image.pullPolicy=Always

helm list

kubectl get deployments,service
