Semantic search with ELSER in Elasticsearch
Elastic Learned Sparse EncodeR(ELSER) is a retrieval model trained by Elastic that enables you to perform semantic search to retrieve more relevant search results.
👉 I created this blog post on docker to demonstrate Linux-optimised ELSER v2. The Elasticsearch version is 8.11.1.
Introduction
Steps follow in the post:
- install ELSER v2: Only once (DevOPs will do for your)
- Create source index where you can insert all your documents
- Create target index
- Create ingestion pipeline
- Reindex process to create embeddings
- Ready to do semantic search using text expansion queries
The general way to generate embedding in the Elasticsearch is using the Sentence Transformer framework1. There are pre-trained models in the HuggingFace with the tag SentenceTransformers for Sentence Transformer. In Elasticsearch, you need to add a field to the index where an embedding for each document will be stored. Elasticsearch provides full support for storing and retrieving vectors, which makes it an ideal database for working with embeddings. There are two types of embeddings:
- Dense vector2: dense vectors hold a fixed-length array of numbers that describe the source text
- This type does not support aggregation or sorting but can store the embedding vector.
- Primarily, you need to use this field for kNN search.
- spare vector3: stores a mapping of features to weights
- This type does not support querying, sorting or aggregating.
- Which is designed to store inferences from the ELSER.
- Multi-valued fields and negative values will be rejected.
sparse_vectoris the field type that should be used with ELSER mappings.- Text expansion semantic search support.
Embeddings returned by Elastic Learned Sparse EncodeR model (ELSER) are a collection of tags (more appropriately called features), each with an assigned weight. The text expansion query uses a NLP model to convert the query text into a list of token-weight pairs which are then used in a query against a sparse vector or rank features field.
NOTE: Only the first 512 extracted tokens per field are considered during semantic search with ELSER.
ELSER v2 was trained from a BERT4 base checkpoint. This has just over 100M parameters, which amounts to about 418 MB of storage for the weights using 32-bit floating point precision.
Install ELSER
ELSER should be available if you have a subscriptions. You can install as follows or should be provided by the DevOps team.
The eaiest way is to deploy using Dev Tools in the Kibana:
PUT _ml/trained_models/.elser_model_2_linux-x86_64
{
  "input": {
	"field_names": ["text_field"]
  }
}
Or you can first download the model navigating via Machine Learning->Trained Models. After download, you can create the model as follows:
NOTE: As shown in the above, for me the recommended model is running on linux platform.
You can find the required memory using the following cmmand
GET _ml/trained_models/_stats
{
  "count": 2,
  "trained_model_stats": [
    {
      "model_id": ".elser_model_2_linux-x86_64",
      "model_size_stats": {
        "model_size_bytes": 274756282,
        "required_native_memory_bytes": 2101346304
      },
      "pipeline_count": 0
    },
    {
      "model_id": "lang_ident_model_1",
      "model_size_stats": {
        "model_size_bytes": 1053992,
        "required_native_memory_bytes": 0
      },
      "pipeline_count": 0
    }
  ]
}
As shown in the above output that is 2.1GB(2101346304 bytes). At least one node should have the 2.1GB capacity to deploy.
You can check the availble memory:
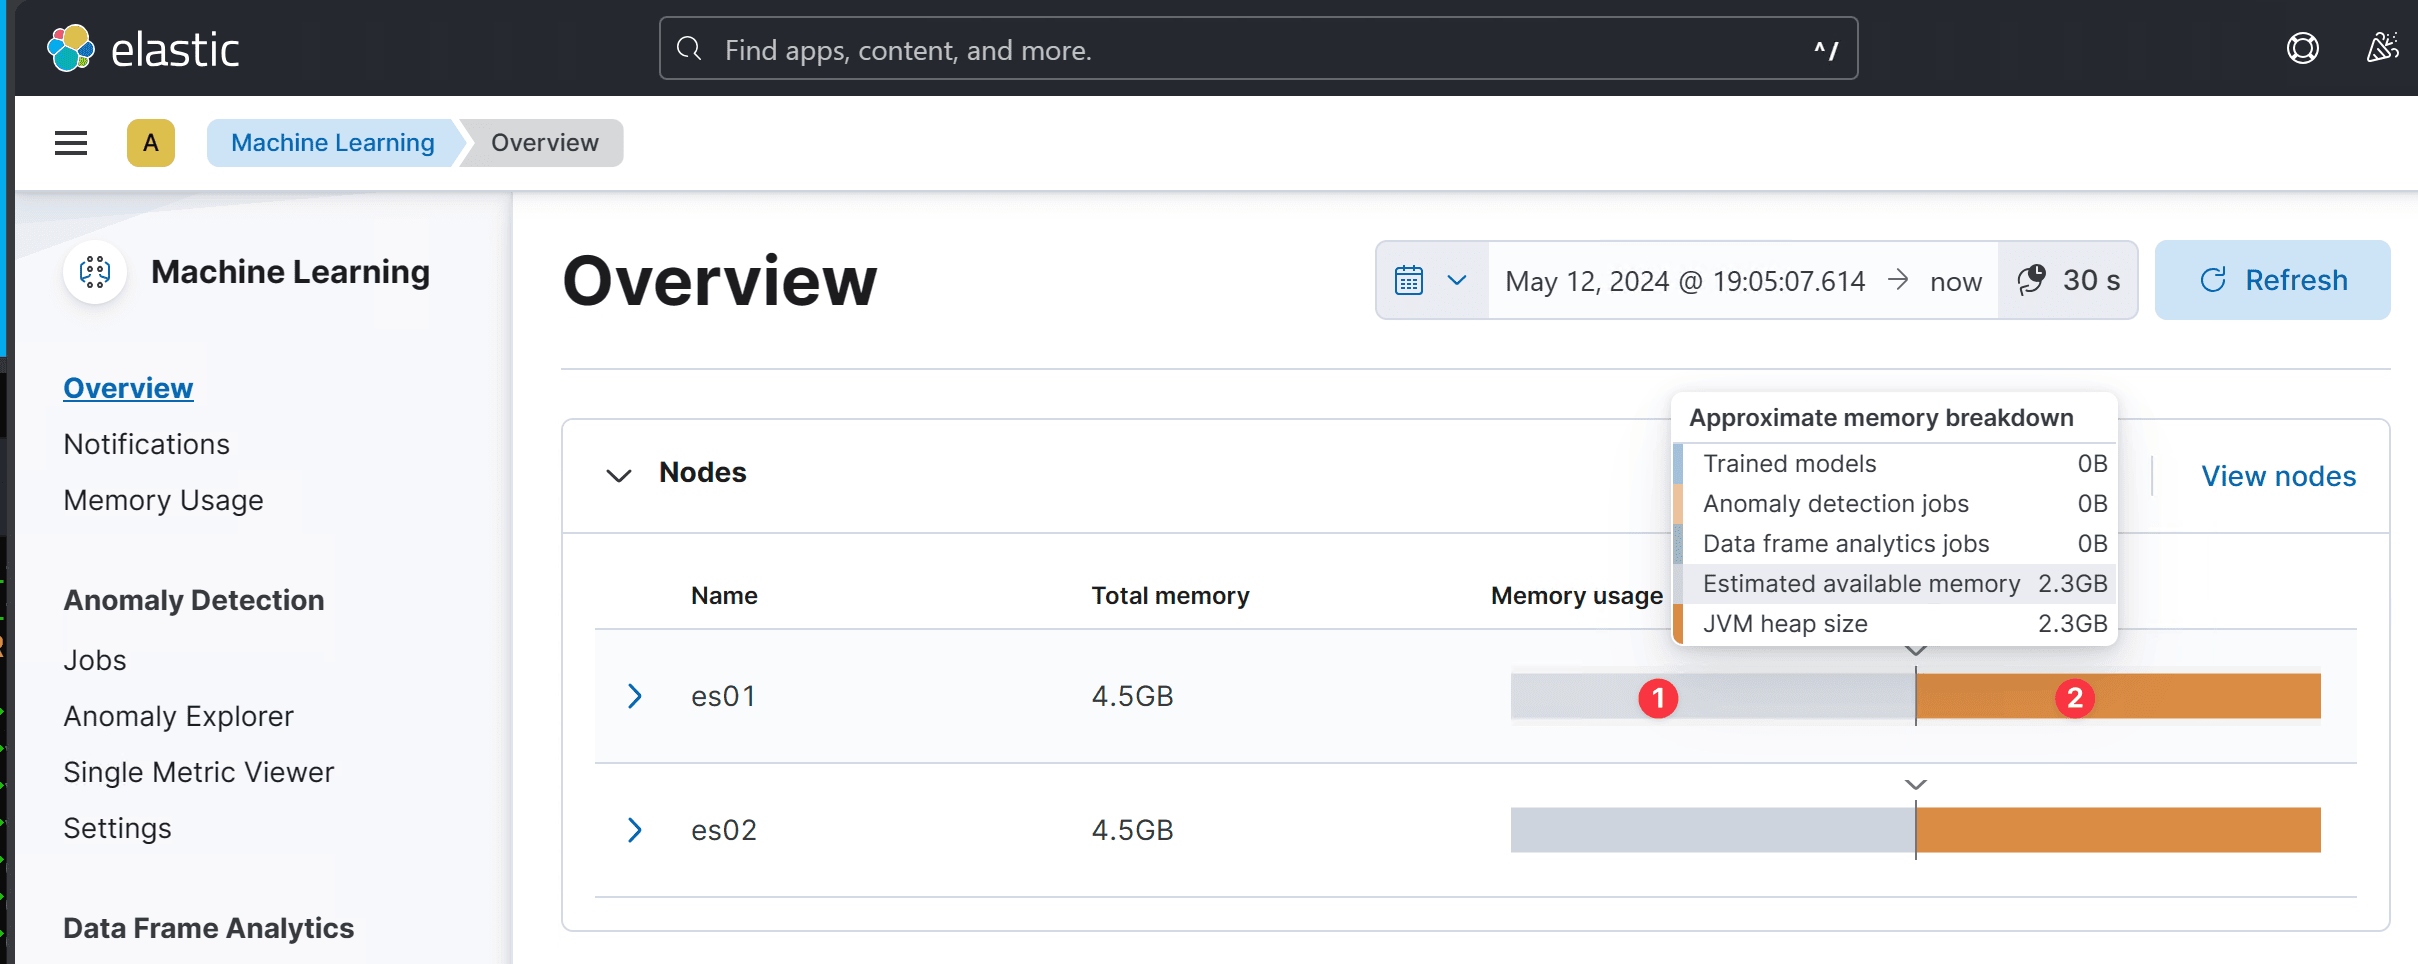
As shown in the above, under the Momory usage, you can find the :
- Estimated availbe memory for the model (2.3GB > 2.1GB)
- Java Heap memory
After the model is deployed, you can use the following command to check the status:
GET _ml/trained_models/.elser_model_2_linux/_stats
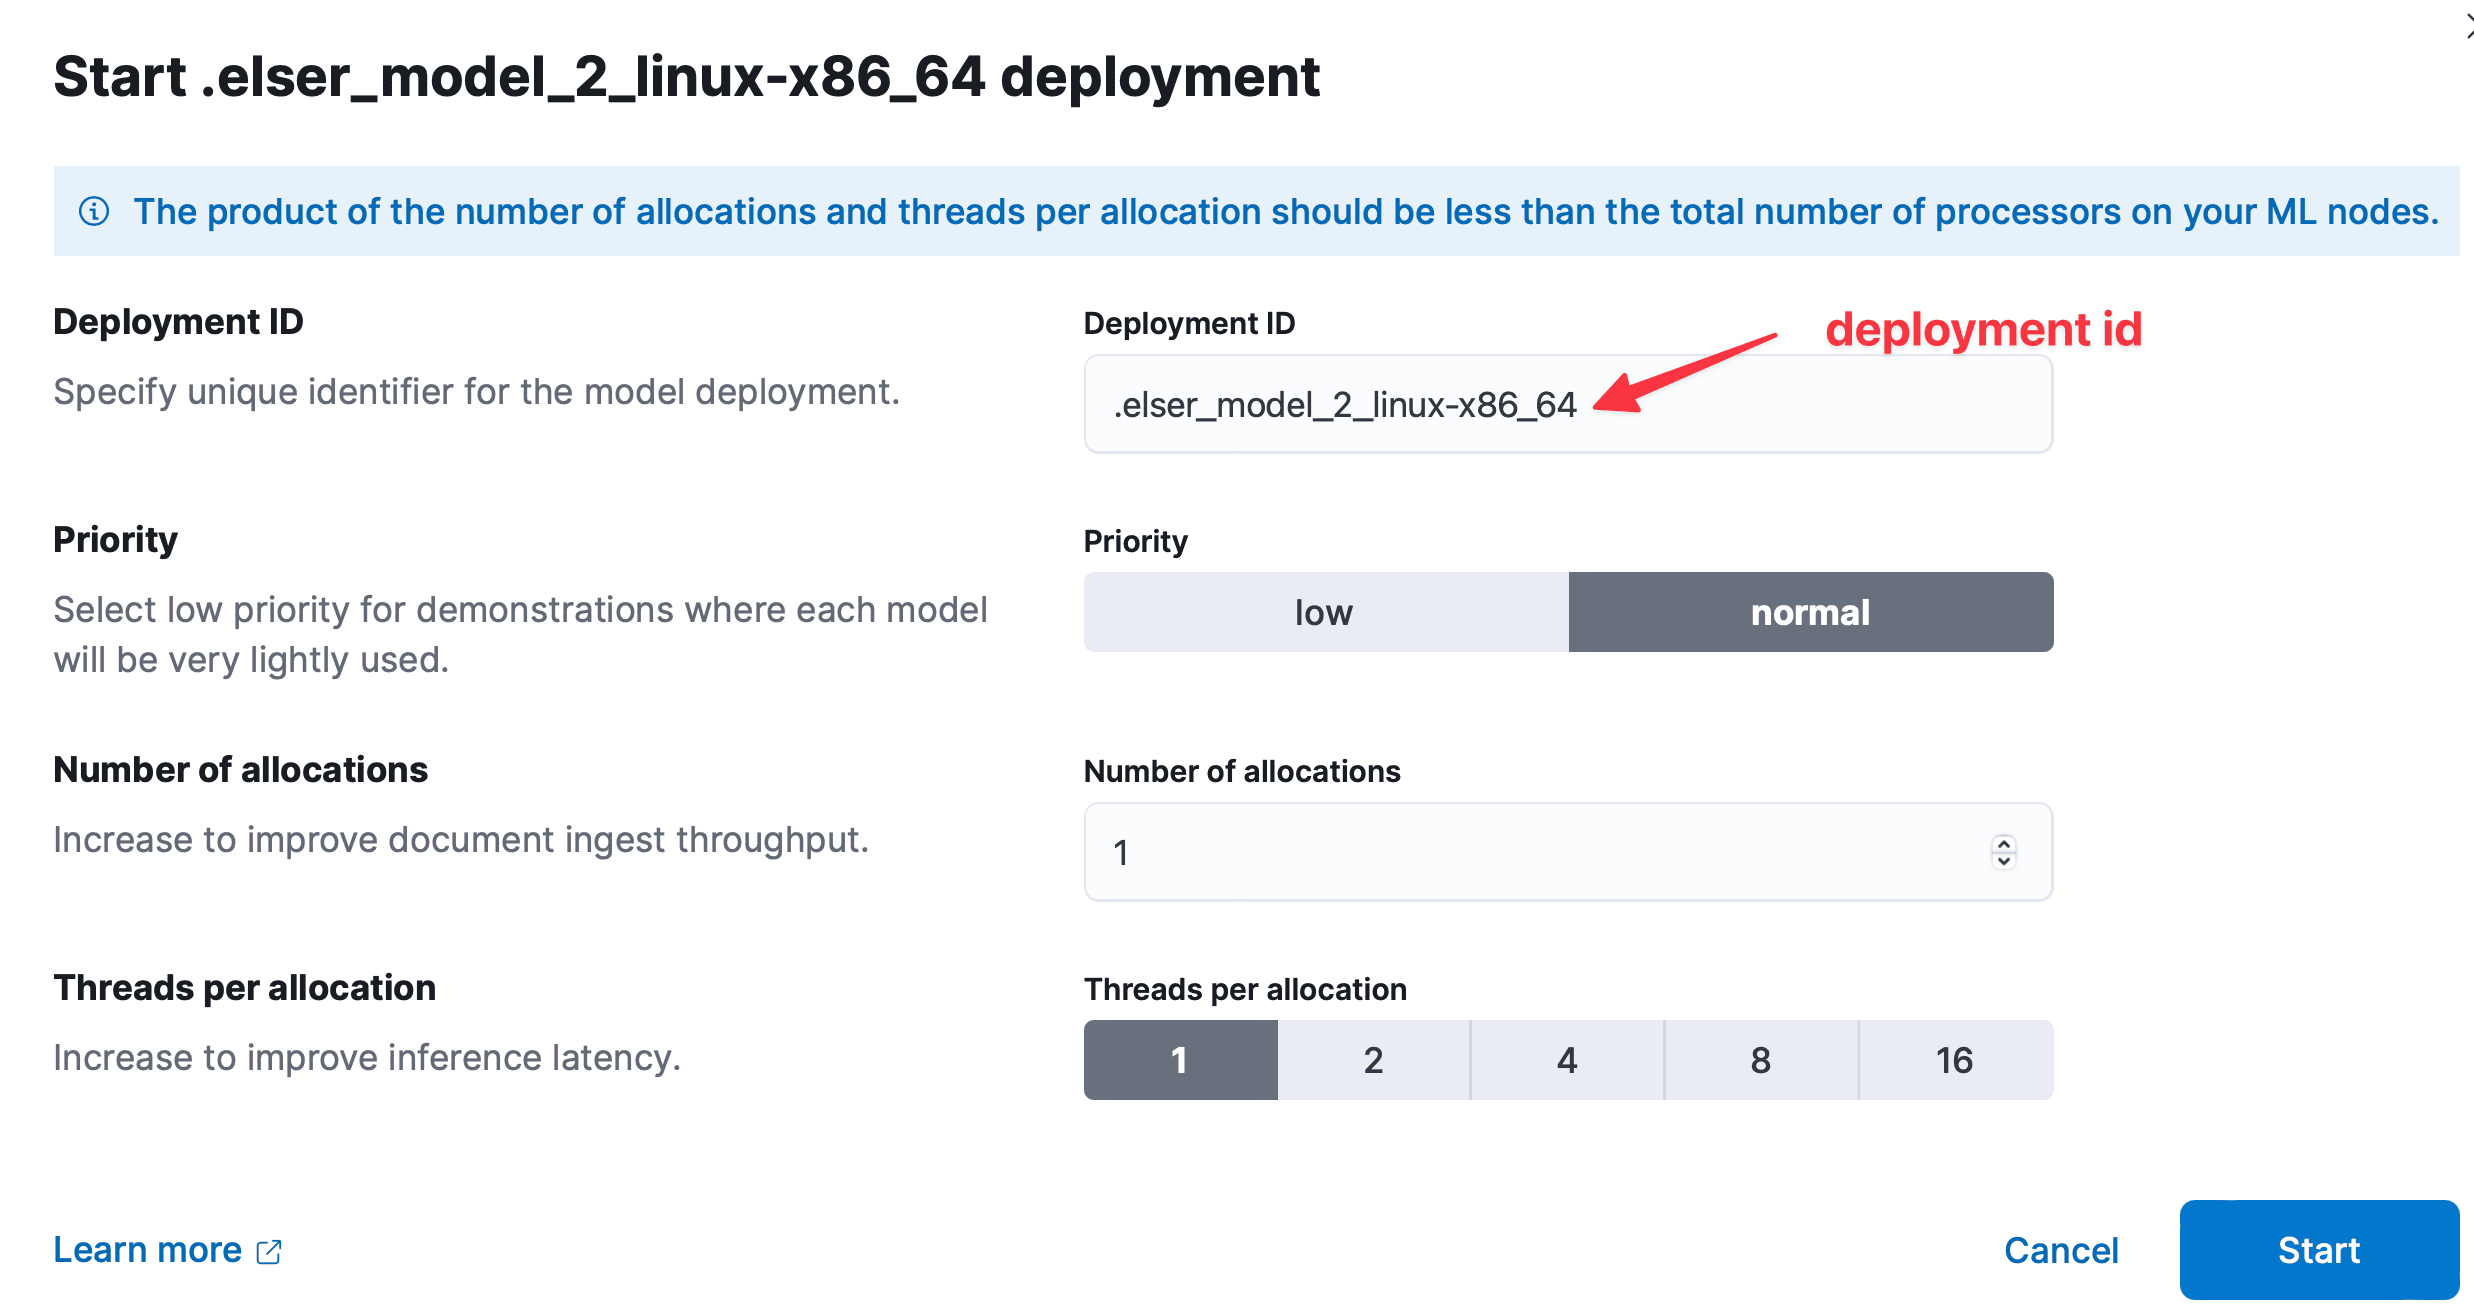
To start the deployment:
POST _ml/trained_models/.elser_model_2_linux-x86_64/deployment/_start?wait_for=started
To stop the deployment
POST _ml/trained_models/elser_model_2_linux-x86_64/deployment/_stop
As shown in the following screenshot, if you navigate via the main menu to Machine Learning, you will find the ELSER installed for the recommended operating system under the Trained Models.
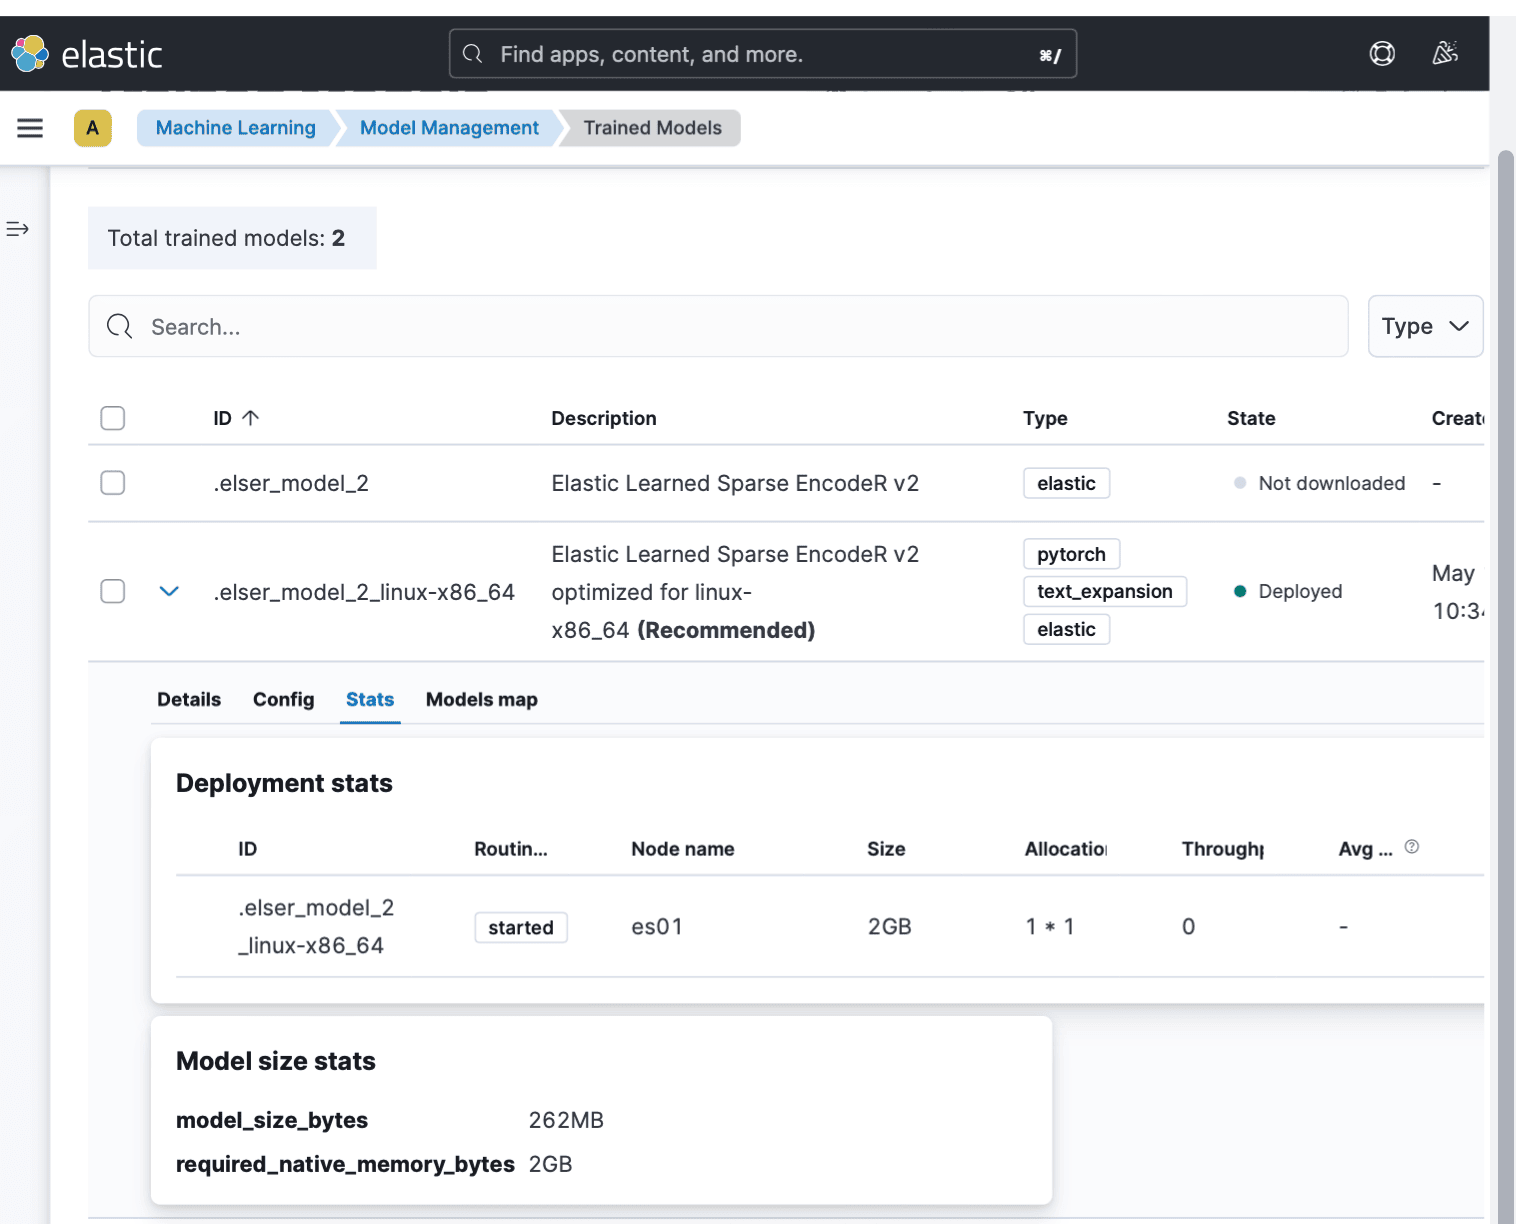
Notice the Deployed model in the above screenshot.
Source Index
For this example, I have to upload data to the test-data index as explained in the Tutorial: semantic search with ELSER because I am elaborating the same tutorial using Linux-based ELSER v2. Here are the mappings for test-data:
{
  "test-data": {
    "mappings": {
      "_meta": {
        "created_by": "file-data-visualizer"
      },
      "properties": {
        "content": {
          "type": "text"
        },
        "id": {
          "type": "long"
        }
      }
    }
  }
}
NOTE: I’ve used a data visualiser to upload the file from tsv file. There are two fields:
- id of type long
- content of type text
It has created the pipeline to inject the data into the index.
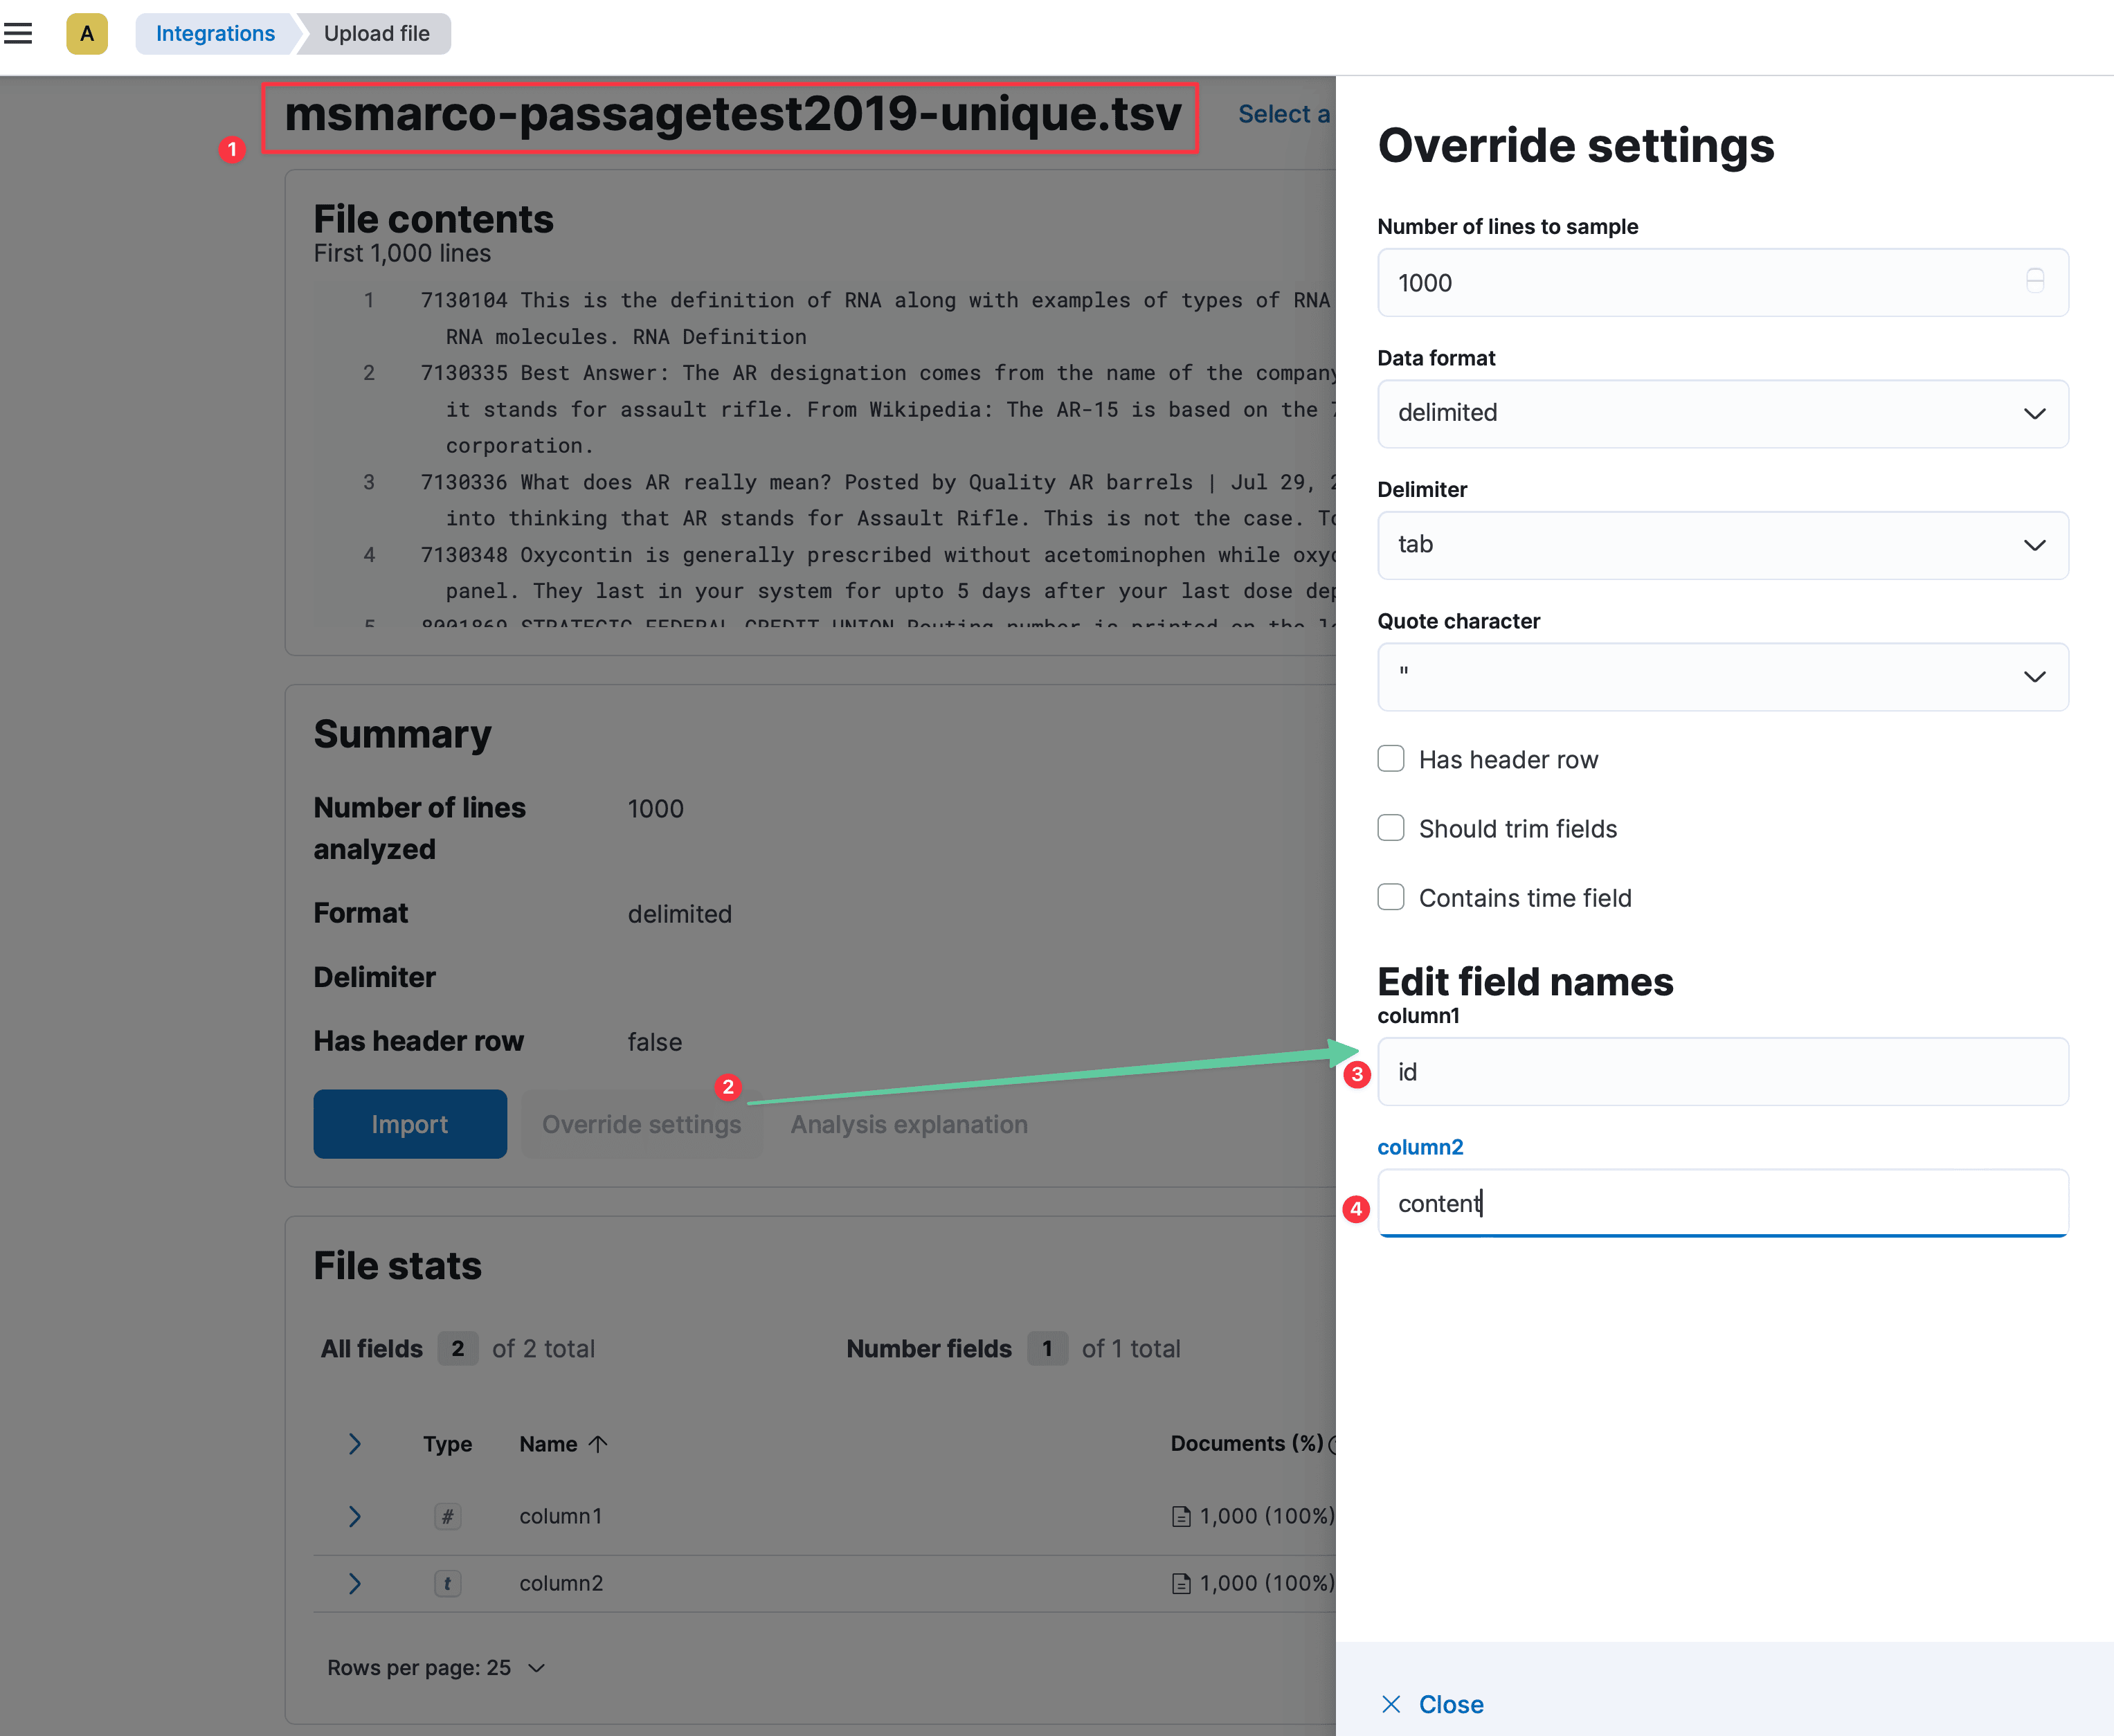
As shown in the (2), override the setting and change the columns as (1 & 2).
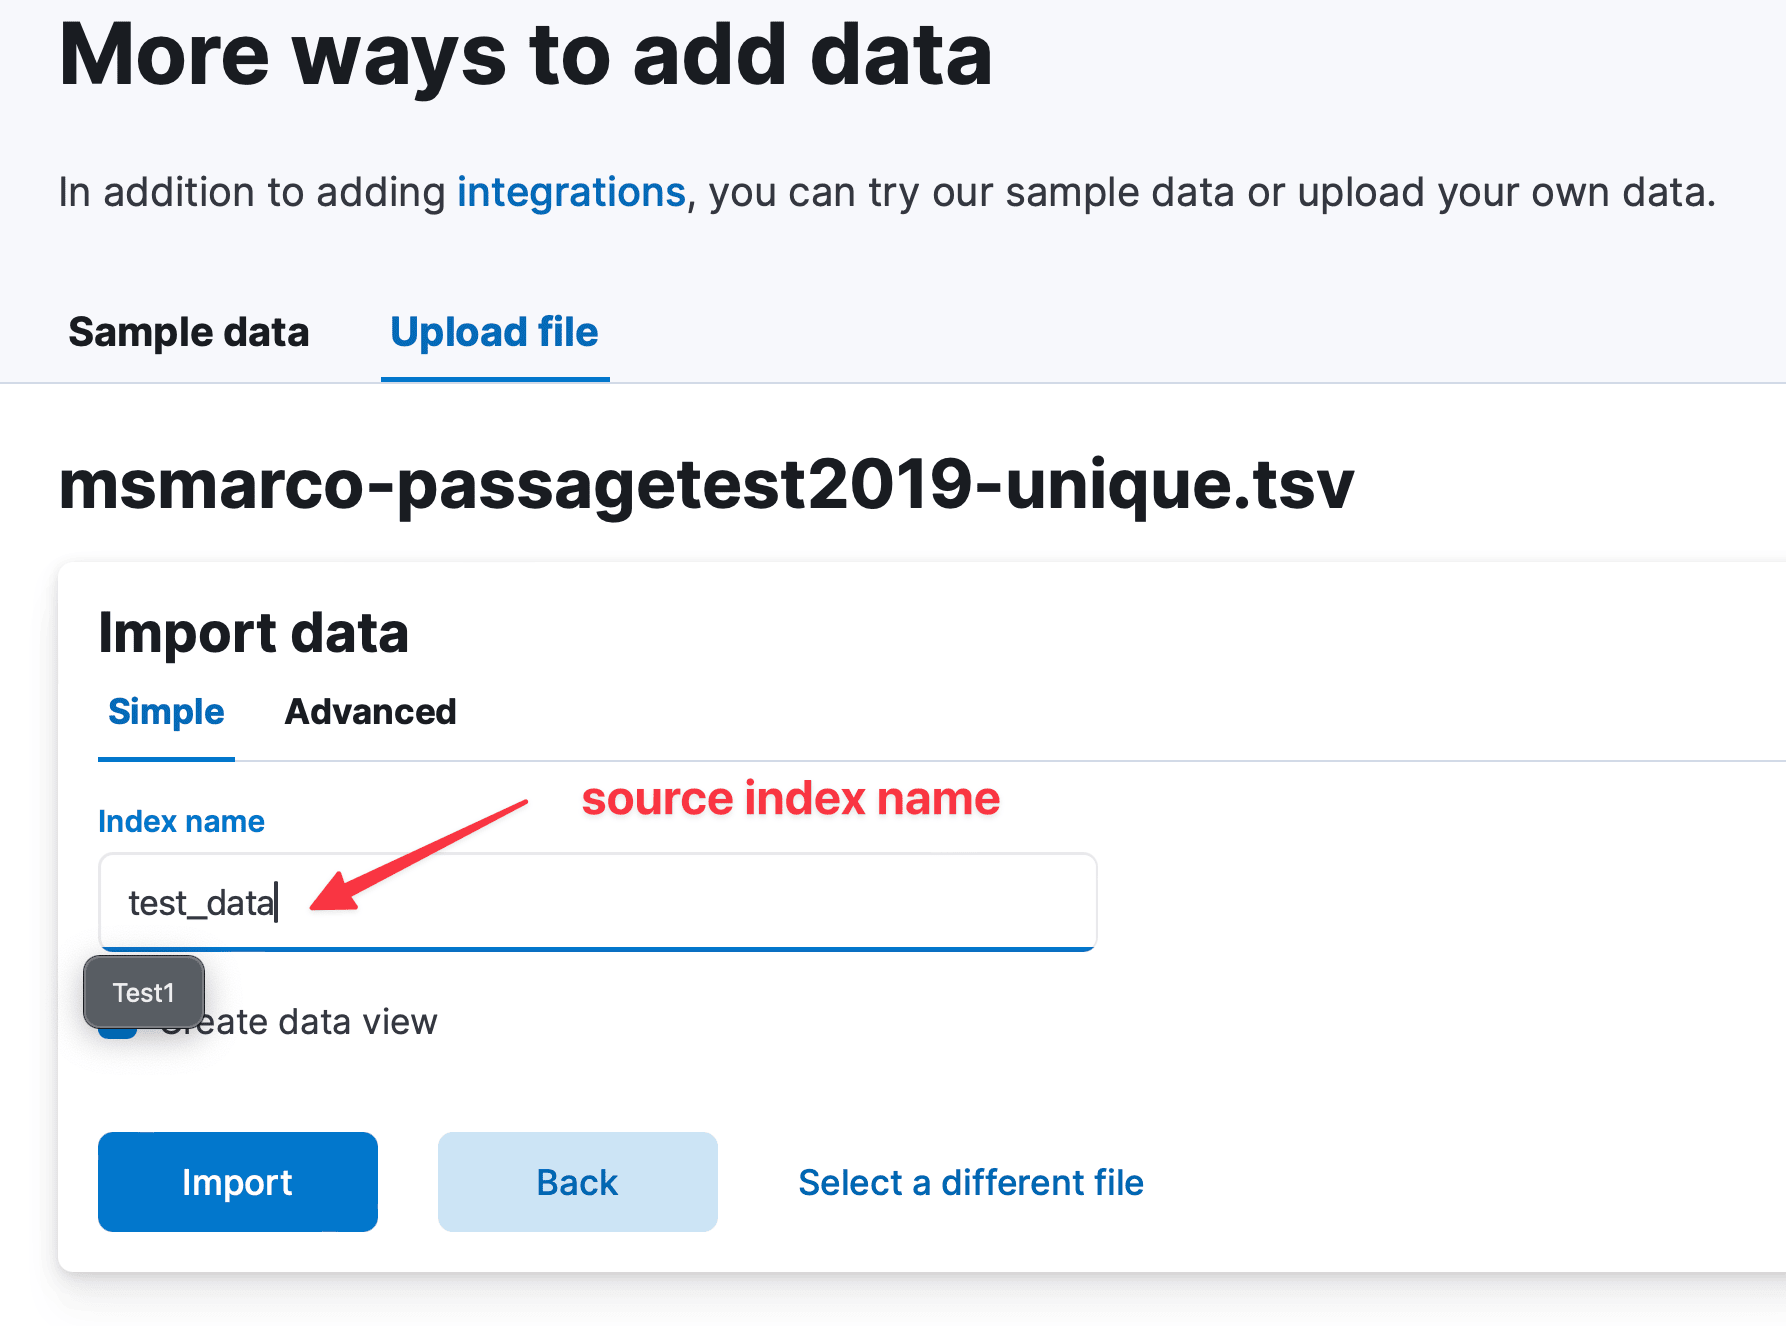
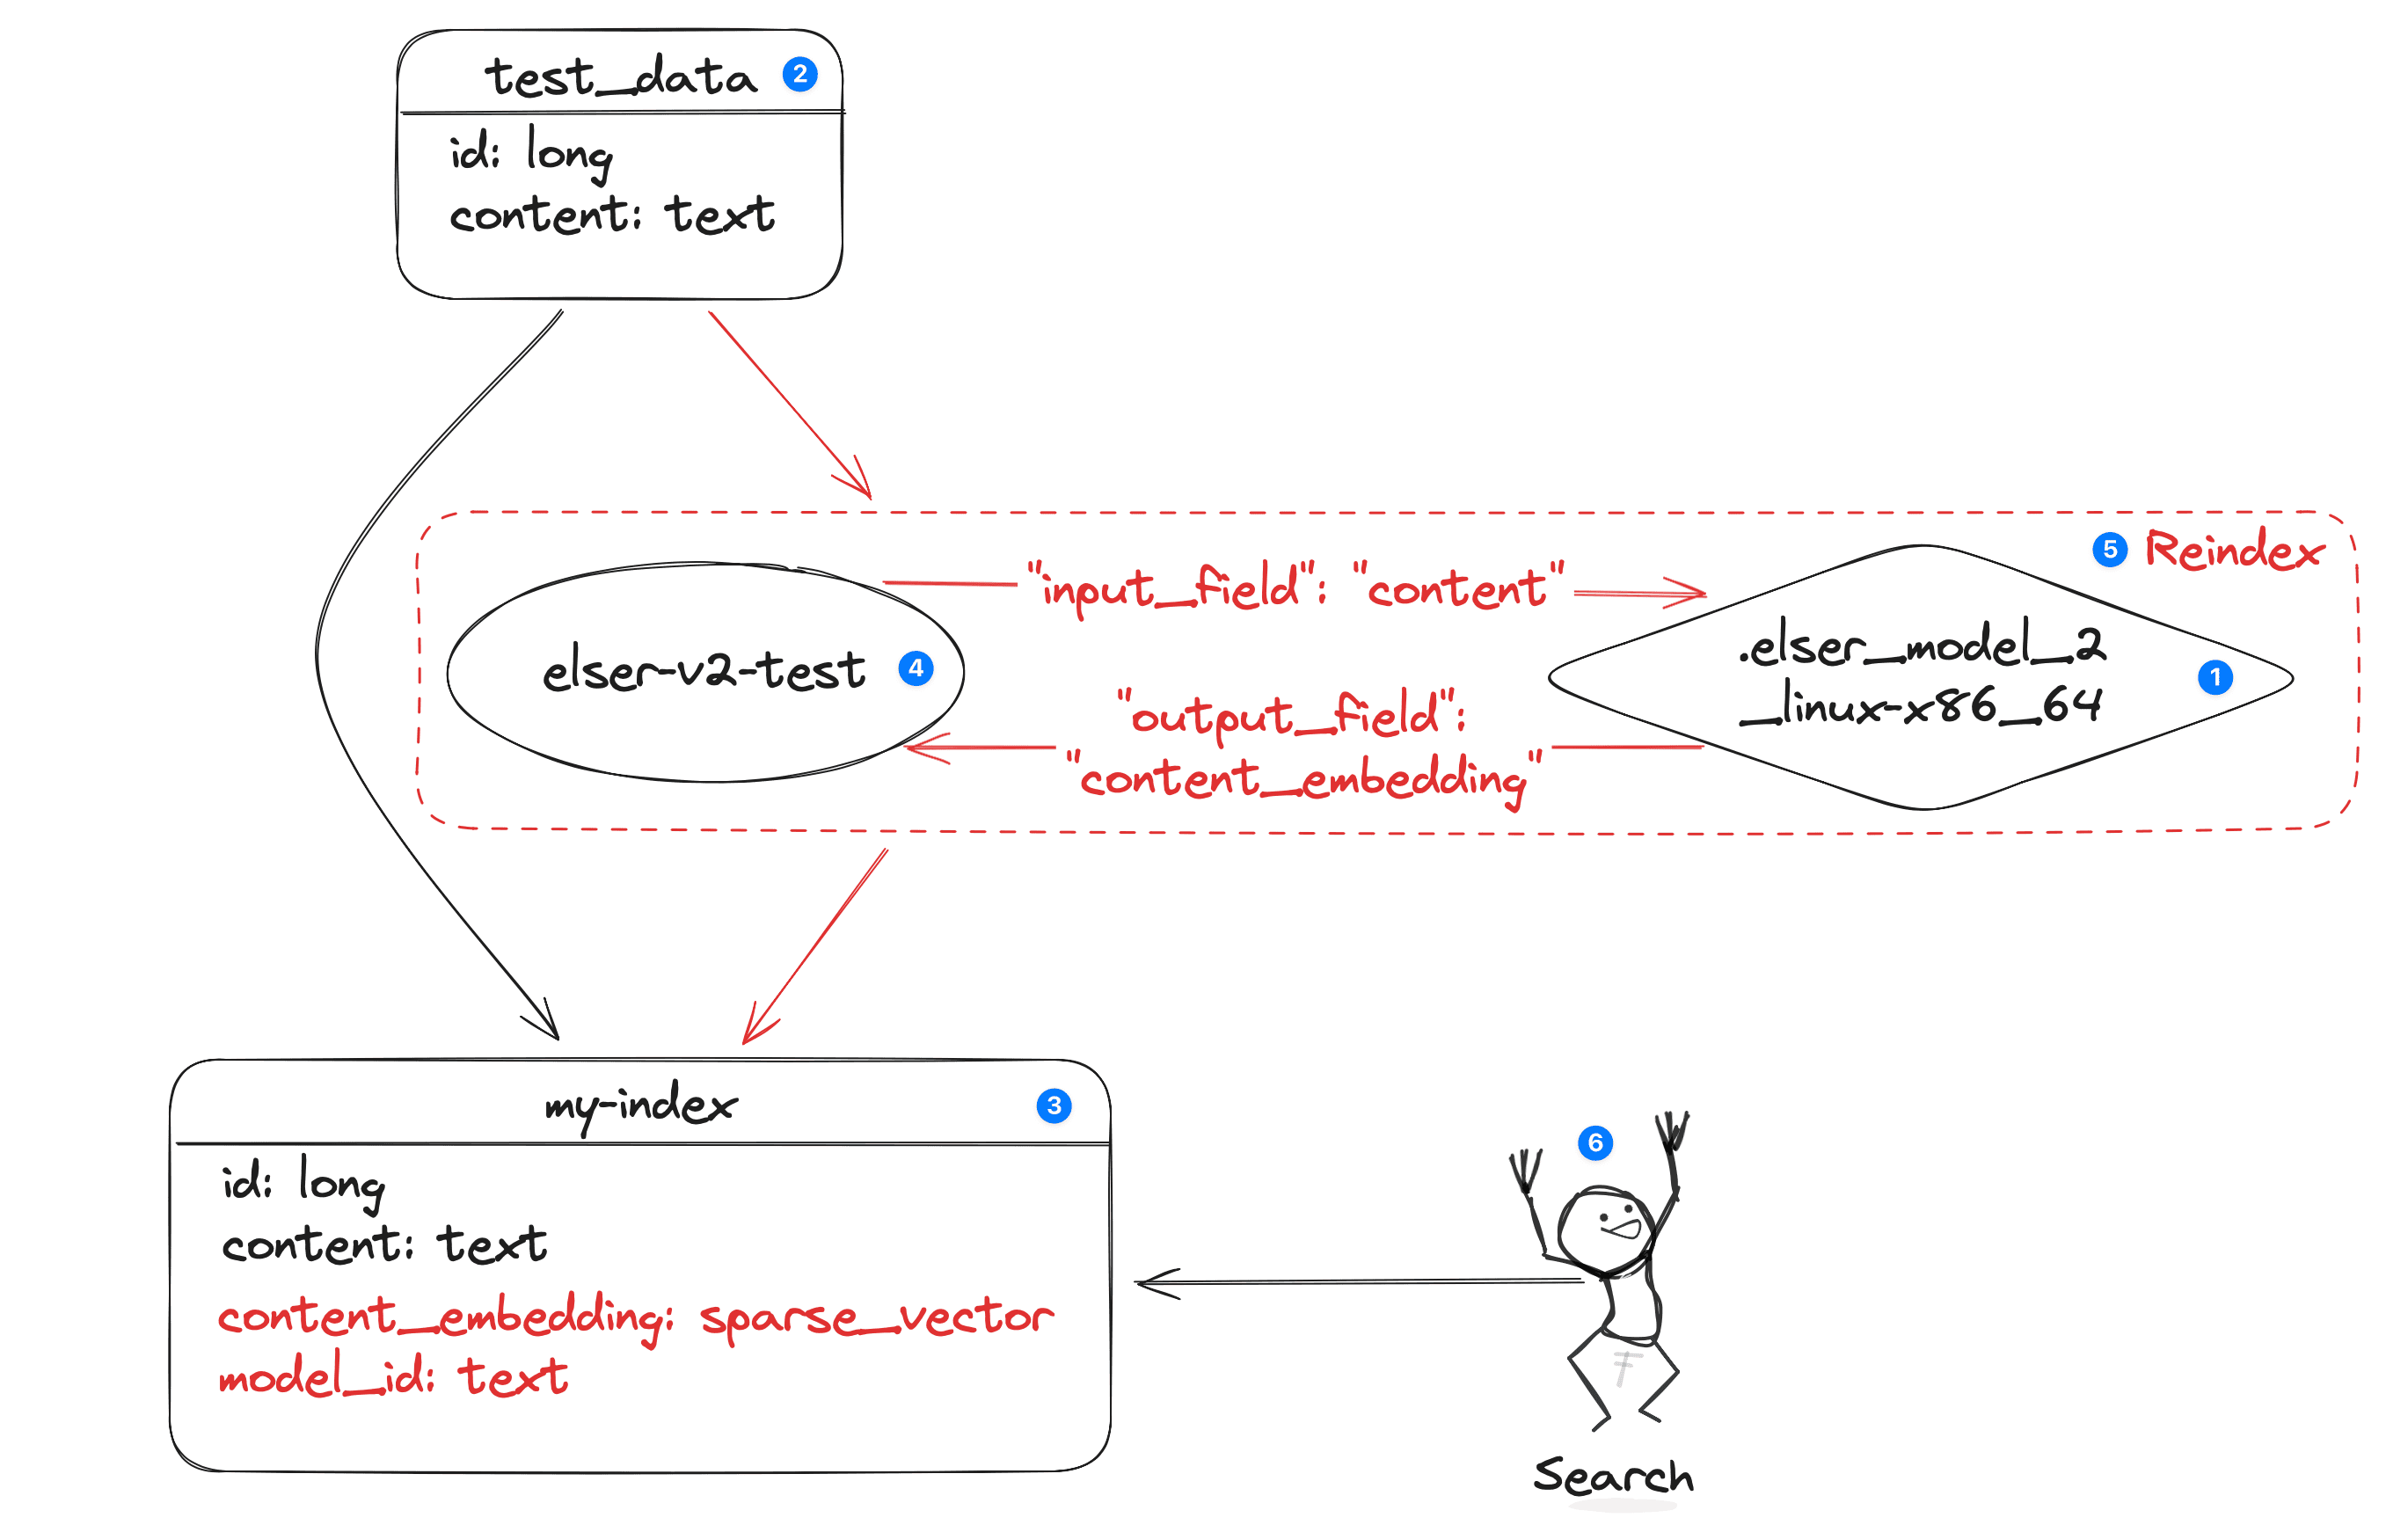
The source index name is test_data. You have to use this index as a source index in the reindex request.
Destination Index
You need to create destination index with the spare vector.
PUT my-index
{
  "mappings": {
    "properties": {
      "content_embedding": {
        "type": "sparse_vector"
      },
      "content": {
        "type": "text"
      }
    }
  }
}
Here
content_embedding: Field contained the generated tokens. It must be refernece by the inference pipeline.content: Field from which to create the sparse vector representation.
Ingestion
Ingest pipelines let you transform your data before indexing5. A pipeline comprises a series of configurable tasks called processors, which run sequentially, making specific changes to input documents. At the end, Elasticsearch adds the transformed documents to your target index.
PUT _ingest/pipeline/elser-v2-test
{
  "processors": [
    {
      "inference": {
        "model_id": ".elser_model_2_linux-x86_64",
        "input_output": [
          {
            "input_field": "content",
            "output_field": "content_embedding"
          }
        ]
      }
    }
  ]
}
NOTE: It is important to remember that the pipeline will be deleted as a part of the model when you delete the ELSER model (in this case
.elser_model_2_linux-x86_64).
Kick of the the ingestion pipeline as follows:
POST _reindex?wait_for_completion=false
{
  "source": {
    "index": "test_data",
    "size": 50
  },
  "dest": {
    "index": "my-index",
    "pipeline": "elser-v2-test"
  }
}
Reindex process will execute the elder-v2-test pipeline in the process to create tokens. Here we are reindex base on the batch size of 50 which can be maximum 1000 and we are not suppose to wait until complete the entire pipeline becuase reindex will take time.
You can check the status of the reindex process using the following request:
GET _tasks/task_id
This may take hours to vectorise 180K+ documents. Every time when your run above command, you will get the information about how many documents were processed out of the total.
Search
For example, here is the text expansion6 query to search.
GET my-index/_search
{
   "query":{
      "text_expansion":{
         "content_embedding":{
            "model_id":".elser_model_2_linux-x86_64",
            "model_text":"<search string>"
         }
      }
   }
}
For example, when you ask the question “What are the main airports in Australia?”, the first answer is similar to the following:
{
  "took": 7161,
  "timed_out": false,
  "_shards": {
    "total": 1,
    "successful": 1,
    "skipped": 0,
    "failed": 0
  },
  "hits": {
    "total": {
      "value": 10000,
      "relation": "gte"
    },
    "max_score": 26.200502,
    "hits": [
      {
        "_index": "my-index",
        "_id": "gP_sbI8B_ono7pTB6NMZ",
        "_score": 26.200502,
        "_source": {
          "content_embedding": {
            "2012": 0.13479704,
            "parking": 0.08273914,
            "fleet": 0.61686254,
            "london": 0.41779545,
... ... ...
       },
          "id": 4116689,
          "model_id": ".elser_model_2_linux-x86_64",
          "content": "Brisbane Airport (IATA code: BNE) is the city's main airport, the third busiest in Australia after Sydney Airport and Melbourne Airport. It is located north-east of the city centre and provides domestic and international passenger services. In the 2012–2012 year, Brisbane Airport handled over 21.3 million passengers."
        }
      },
This result hows the highest ranking document.
REFERENCE