AWS CFN - Create IGW and NAT
In this post, let’s see how to create Internet Gateway (IGW) and NAT Gateway using Cloudformation (CFN).

This post is a continuation of the AWS CFN - Create VPC and subnets.
The prerequisite for this post is AWS Cloudformation to create AWS VPC.
There is one parameter to pass that is the VPC created earlier, for example, ParameterKey=NetworkStack,ParameterValue=oj-test-stack :
AWSTemplateFormatVersion: "2010-09-09"
Description: IGW and RT public trafic

Parameters:
  NetworkStack:
    Type: "String"
    Description: "Apply to the network stack"
IGW
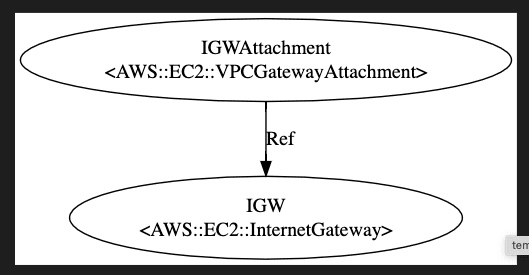
The first resource is IGW:
Resources:
  # Create IGW
  IGW:
    Type: AWS::EC2::InternetGateway
    Properties:
      Tags:
      - Key: Name
        Value: !Ref AWS::StackName

  # Attached to the VPC
  IGWAttachment:
    Type: AWS::EC2::VPCGatewayAttachment
    Properties:
      InternetGatewayId: !Ref IGW
      VpcId:
        Fn::ImportValue:
          !Sub ${NetworkStack}-VpcId
Here AWS::StackName is the current stack name, for example oj-test-igwandnat-stack. The IGW has to create in the current stack and attached to the VPC, which is provided via NetworkStack from the parameter as shown in line# 17. The VpcId is derived property.
RT
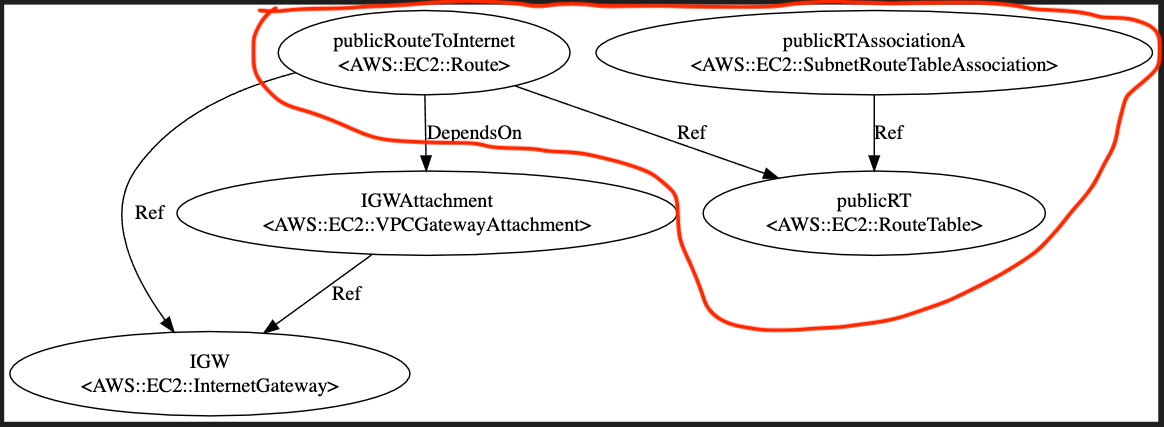
First create route table which is pointing to the IGW where internet traffic is enable in its nature, therefore, which is public.
  # public Route Table
  publicRT:
    Type: AWS::EC2::RouteTable
    Properties:
      VpcId:
        Fn::ImportValue:
          !Sub ${NetworkStack}-VpcId
      Tags:
      - Key: Name
        Value: Dmz Routes
      - Key: Scope
        Value: public

  # Add route to the route table
  publicRouteToInternet:
    DependsOn: IGWAttachment
    Type: AWS::EC2::Route
    Properties:
      RouteTableId: !Ref publicRT
      GatewayId: !Ref IGW
      DestinationCidrBlock: 0.0.0.0/0

  # RT associate with subnets
  publicRTAssociationA:
    Type: AWS::EC2::SubnetRouteTableAssociation
    Properties:
      RouteTableId: !Ref publicRT
      SubnetId:
        Fn::ImportValue: !Sub ${NetworkStack}-DmzSubnetAId
There are 3 steps:
-
create the
publicRTand attach it to the VPC. -
Then add the routes to the routeing table. All the traffic has to flow through the IGW except local route as follows:

-
Associate the routeing table to the subnet.
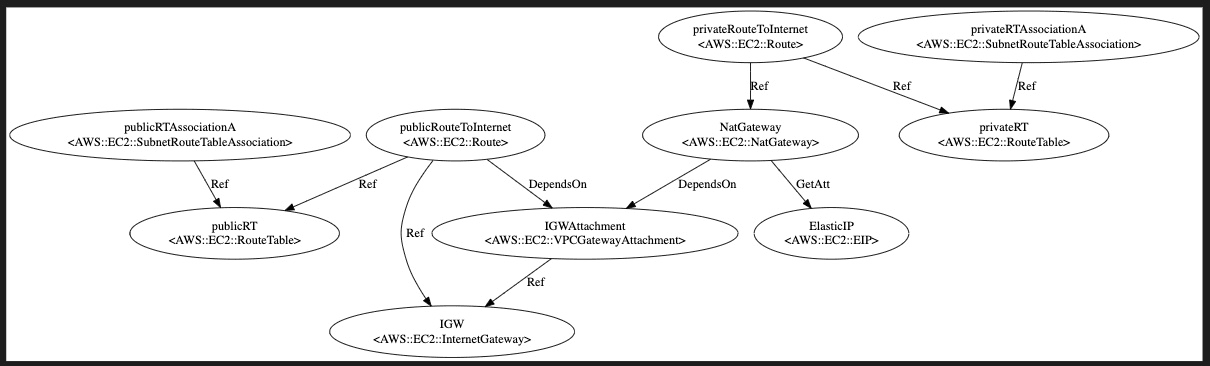
For Apps, you need to create a private route table pointing to NAT which is only out going traffic allows as follows:
privateRT:
    Type: AWS::EC2::RouteTable
    Properties:
      VpcId:
        Fn::ImportValue:
          !Sub ${NetworkStack}-VpcId
      Tags:
      - Key: Name
        Value: App Routes
      - Key: Scope
        Value: private

  privateRouteToInternet:
    Type: AWS::EC2::Route
    Properties:
      RouteTableId:
        Ref: privateRT
      DestinationCidrBlock: 0.0.0.0/0
      NatGatewayId: !Ref NatGateway

  # RT associated with subnet
  privateRTAssociationA:
    Type: AWS::EC2::SubnetRouteTableAssociation
    Properties:
      RouteTableId: !Ref privateRT
      SubnetId:
        Fn::ImportValue: !Sub ${NetworkStack}-SubnetAppAId
In the AWS console,

In the second row, notice the nat-… which is created in the following section.
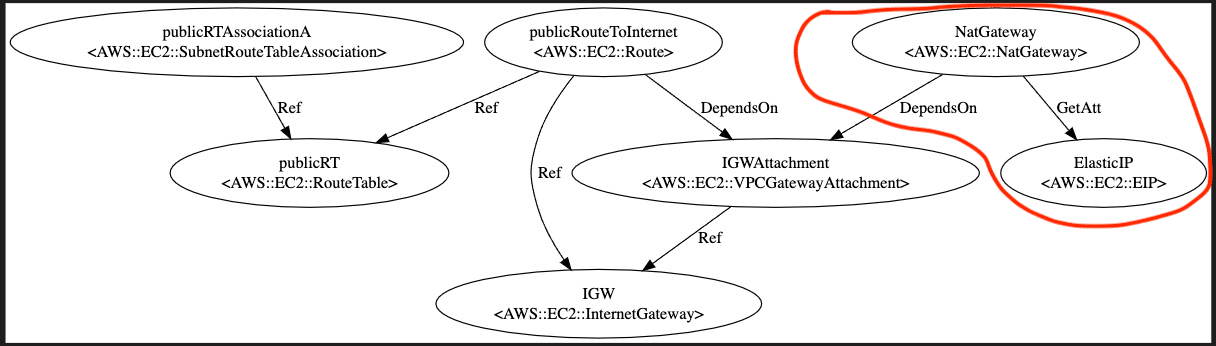
NAT
As shown in the line# 3 DependsOn, NAT instance creation shouldn’t start until IGW attachment has been completed.
  # NAT
  NatGateway:
    DependsOn: IGWAttachment
    Type: AWS::EC2::NatGateway
    Properties:
      AllocationId: !GetAtt   ElasticIP.AllocationId # Meed EIP
      SubnetId:
         Fn::ImportValue: !Sub ${NetworkStack}-DmzSubnetAId

  # Elastic IP
  ElasticIP:
    Type: AWS::EC2::EIP
    Properties:
      Domain: vpc
For dedicated route, NAT Gateway need elastic IP.
ACL
There is always a default NACL which pointing to all the subnets. for Network Access Control List will be the central place to pass traffic via subnet. ACLs are stateless, therefore you have to define the inbound and outbound rules.
Here the inbound of the default ACL:


As AWS stated:
The default network ACL is configured to allow all traffic to flow in and out of the subnets with which it is associated. Each network ACL also includes a rule whose rule number is an asterisk. This rule ensures that if a packet doesn’t match any of the other numbered rules, it’s denied. You can’t modify or remove this rule.
Here the custom ACL to create:

In the above diagram, DmzAclAssociationB and DmzAclAssociationC are not shown for simplicity.
  # ACL to control traffic at subnet level
  DmzAcl:
    Type: AWS::EC2::NetworkAcl
    Properties:
      VpcId:
        Fn::ImportValue:
          !Sub ${NetworkStack}-VpcId
      Tags:
      - Key: Name
        Value: ACL security
      - Key: Scope
        Value: public

  # NACL must be associated with Dmz subnets
  DmzAclAssociationA:
    Type: AWS::EC2::SubnetNetworkAclAssociation
    Properties:
      NetworkAclId: !Ref DmzAcl
      SubnetId:
        Fn::ImportValue: !Sub ${NetworkStack}-DmzSubnetAId
  DmzAclAssociationB:
    Type: AWS::EC2::SubnetNetworkAclAssociation
    Properties:
      NetworkAclId: !Ref DmzAcl
      SubnetId:
        Fn::ImportValue: !Sub ${NetworkStack}-DmzSubnetBId
  DmzAclAssociationC:
    Type: AWS::EC2::SubnetNetworkAclAssociation
    Properties:
      NetworkAclId: !Ref DmzAcl
      SubnetId:
        Fn::ImportValue: !Sub ${NetworkStack}-DmzSubnetCId

  # NACL in bounds
  DmzAclIngress4UDP:
    Type: AWS::EC2::NetworkAclEntry
    Properties:
      NetworkAclId: !Ref DmzAcl
      RuleAction: allow
      RuleNumber: 100
      Protocol: 17 # for UDP
      CidrBlock: 0.0.0.0/0
      PortRange:
        From: 123
        To: 123

  # NACL out bounds
  DmzAclEgress4UDP:
    Type: AWS::EC2::NetworkAclEntry
    Properties:
      NetworkAclId: !Ref DmzAcl
      RuleAction: allow
      Egress: true
      RuleNumber: 100
      Protocol: 17 # for UDP
      CidrBlock: 0.0.0.0/0
      PortRange:
        From: 123
        To: 123
There are 3 steps:
-
Create ACL for the VPC
-
Associate with the subnets of the VPC
-
Define inbounds
-
Define outbounds
As in the AWS documentation:
Rules are evaluated starting with the lowest numbered rule. As soon as a rule matches traffic, it’s applied regardless of any higher-numbered rule that might contradict it.


Deploy
Command to validate
cloudformation validate-template --template-body file://vpc-example-1-1.yaml
To create the stack
aws cloudformation create-stack --template-body file://vpc-example-1-1.yaml --parameters ParameterKey=NetworkStack,ParameterValue=oj-test-stack --stack-name oj-test-igwandnat-stack
If you want to get event information:
aws cloudformation describe-stack-events --stack-name oj-test-igwandnat-stack --query 'StackEvents[].[{Resource:LogicalResourceId, Status:ResourceStatus, Reason:REsourceStatusReason}]' --output table
Output:
-------------------------------------------------------------
|                    DescribeStackEvents                    |
+--------+---------------------------+----------------------+
| Reason |         Resource          |       Status         |
+--------+---------------------------+----------------------+
|  None  |  oj-test-igwandnat-stack  |  CREATE_COMPLETE     |
|  None  |  privateRouteToInternet   |  CREATE_COMPLETE     |
|  None  |  privateRouteToInternet   |  CREATE_IN_PROGRESS  |
|  None  |  privateRouteToInternet   |  CREATE_IN_PROGRESS  |
|  None  |  NatGateway               |  CREATE_COMPLETE     |
|  None  |  publicRouteToInternet    |  CREATE_COMPLETE     |
|  None  |  NatGateway               |  CREATE_IN_PROGRESS  |
|  None  |  publicRouteToInternet    |  CREATE_IN_PROGRESS  |
...
+--------+---------------------------+----------------------+
Change management
If you update the template, you can use the change set approach:
CHANGE_SET=$(aws cloudformation create-change-set --change-set-name allow-http-traffic --stack-name oj-test-security-stack --template-body file://vpc-example-1-2.yaml --parameters ParameterKey=NetworkStack,UsePreviousValue=true --query 'Id' --output text)
To describe the change set
aws cloudformation describe-change-set --change-set-name $CHANGE_SET --query '[StackName,Changes[].ResourceChange]' --output text
Output:
oj-test-security-stack
Add     DmzAclEgressWeb AWS::EC2::NetworkAclEntry
Add     DmzAclEntryEgressHttps  AWS::EC2::NetworkAclEntry
Add     DmzAclEntryEgressHttp   AWS::EC2::NetworkAclEntry
Add     DmzAclEntryIngressHttps AWS::EC2::NetworkAclEntry
Add     DmzAclEntryIngressHttp  AWS::EC2::NetworkAclEntry
Add     DmzAclIngressWeb        AWS::EC2::NetworkAclEntry
To deploy the change set after review:
aws cloudformation execute-change-set --change-set-name ${CHANGE_SET} && aws cloudformation wait stack-update-complete --stack-name oj-test-security-stack
To delete the change set
aws cloudformation delete-change-set --stack-name oj-test-security-stack --change-set-name allow-http-traffic
Please refer to the reference1 used to create this post for more information.
-
Automation in AWS with CloudFormation, CLI, and SDKs, Richard A. Jones ↩