Steup LangGraph Studio for AI Agent

Complete LangGraph Studio setup guide for AI agent development featuring visual debugging, real-time execution monitoring, and hot reloading capabilities. Step-by-step tutorial includes working code examples for building production-ready AI agents with tool integration, state management, conditional routing, and seamless LangSmith tracing for optimized multi-step reasoning processes.
✅ Complete UV setup - from installation to project configuration
✅ Working agent example - with tools, state management, and proper routing
✅ Multiple testing methods - Studio UI, Python scripts, and direct API calls
Introduction
Why do we need to use LangGraph Studio:
- Visual Development: See your agent’s execution flow in real-time
- Hot Reloading: Changes to your code are automatically reflected
- Debugging: Built-in debugging capabilities with LangSmith integration
- Streaming: Real-time streaming of responses
- State Management: Persistent conversation state across interactions
This setup gives you a powerful development environment for building sophisticated AI agents with LangGraph!
Prerequisites
- Python 3.11+ installed
- UV package manager installed
- API keys for your chosen LLM provider (e.g., OpenAI) and LangSmith.
For demonstration purposes, I have used the mock functions with actual APIs (weather API and search API, etc.). And no use of more sophisticated reasoning, memory, or multi-agent interactions, as this is to maintain simplicity. And not explain the LangGraph Platform for production deployment.
Studio setup
Created this project using the following command:
uv init --python 3.12.11 learn-langgraph
cd learn-langgraph
Install the Studio server
uv add "langgraph-cli[inmem]"
The
[inmem]extra is specifically required for thelanggraph devcommand to work properly
Install OpenAI and other necessary packages:
uv add langchain-openai python-dotenv langgraph
Before running the server, you have to set the OpenAI Key:
export OPENAI_API_KEY="sk-proj-...."
As well as in the .env file, you have to have an entry for the LANGSMITH_API_KEY.
LANGCHAIN_TRACING_V2="true"
LANGCHAIN_PROJECT="my-langgraph-project"
LANGCHAIN_API_KEY="your_langsmith_api_key_here"
Monitor: Integrate with LangSmith for detailed tracing and debugging. The first line must have the value ‘true’.
You have to provide the location of the graph in the file langgraph.json:
{
  "dependencies": ["."],
  "graphs": {
    "agent": "./agent.py:graph"
  },
  "env": ".env"
}
Run the dev server
uv run langgraph dev
You will get the URL,
Welcome to
╦  ┌─┐┌┐┌┌─┐╔═╗┬─┐┌─┐┌─┐┬ ┬
║  ├─┤││││ ┬║ ╦├┬┘├─┤├─┘├─┤
╩═╝┴ ┴┘└┘└─┘╚═╝┴└─┴ ┴┴  ┴ ┴

Ready!
- API: http://localhost:2024
- Docs: http://localhost:2024/docs
- LangGraph Studio Web UI: https://smith.langchain.com/studio/?baseUrl=http://127.0.0.1:2024
Use the LangGraph Studio Web UI, which can be navigated via the Chrome browser.
However, if you need to use Safari or Firefox, use the tunnel as follows:
uv run langgraph dev --tunnel
The Simple Agent Example:
The included agent demonstrates core LangGraph concepts:
- StateGraph with message-based state
- Tool integration (weather and web search)
- Conditional routing between agent reasoning and tool execution
- Proper LLM integration with tool binding
# agent.py
from typing import TypedDict, Literal
from langgraph.graph import StateGraph, START, END
from langgraph.prebuilt import ToolNode
from langchain_openai import ChatOpenAI
from langchain_core.messages import HumanMessage, AIMessage, SystemMessage
import operator
from typing import Annotated, Sequence

# Define the state that will be passed between nodes
class AgentState(TypedDict):
    messages: Annotated[Sequence[HumanMessage | AIMessage | SystemMessage], operator.add]

# Initialize the LLM
llm = ChatOpenAI(model="gpt-4o-mini", temperature=0) # OPENAI_API_KEY as environment variable

# Define a simple tool
def get_weather(location: str) -> str:
    """Get the current weather for a location."""
    # Mock weather function - replace with real API
    return f"The weather in {location} is sunny with 22°C"

def search_web(query: str) -> str:
    """Search the web for information."""
    # Mock search function - replace with real search API
    return f"Search results for '{query}': Here are some relevant articles and information..."

# Bind tools to the LLM
tools = [get_weather, search_web]
llm_with_tools = llm.bind_tools(tools)

# Define the agent node
def agent_node(state: AgentState):
    """The main agent reasoning node."""
    messages = state["messages"]

    # Add system message if this is the first interaction
    if not any(isinstance(msg, SystemMessage) for msg in messages):
        system_msg = SystemMessage(content="""You are a helpful AI assistant. You have access to tools for getting weather information and searching the web.

Use these tools when appropriate to help answer user questions. Always be helpful and provide detailed responses.""")
        messages = [system_msg] + list(messages)

    response = llm_with_tools.invoke(messages)
    return {"messages": [response]}

# Define tool execution node
def tool_node(state: AgentState):
    """Execute tools when the agent calls them."""
    messages = state["messages"]
    last_message = messages[-1]

    # Execute tool calls
    tool_results = []
    if hasattr(last_message, 'tool_calls') and last_message.tool_calls:
        for tool_call in last_message.tool_calls:
            tool_name = tool_call["name"]
            tool_args = tool_call["args"]

            if tool_name == "get_weather":
                result = get_weather(**tool_args)
            elif tool_name == "search_web":
                result = search_web(**tool_args)
            else:
                result = f"Unknown tool: {tool_name}"

            # Create tool message
            from langchain_core.messages import ToolMessage
            tool_message = ToolMessage(
                content=result,
                tool_call_id=tool_call["id"]
            )
            tool_results.append(tool_message)

    return {"messages": tool_results}

# Define routing logic
def should_continue(state: AgentState) -> Literal["tools", "end"]:
    """Determine if we should continue to tools or end."""
    messages = state["messages"]
    last_message = messages[-1]

    # If there are tool calls, continue to tools
    if hasattr(last_message, 'tool_calls') and last_message.tool_calls:
        return "tools"
    else:
        return "end"

# Build the graph
workflow = StateGraph(AgentState)

# Add nodes
workflow.add_node("agent", agent_node)
workflow.add_node("tools", tool_node)

# Add edges
workflow.add_edge(START, "agent")
workflow.add_conditional_edges(
    "agent",
    should_continue,
    {
        "tools": "tools",
        "end": END
    }
)
workflow.add_edge("tools", "agent")

# Compile the graph
graph = workflow.compile()
You can test your agent in several ways:
To test via API:
curl -s --request POST \
  --url "http://localhost:2024/runs/stream" \
  --header 'Content-Type: application/json' \
  --data '{
    "assistant_id": "agent",
    "input": {
      "messages": [
        {
          "role": "human",
          "content": "What is the weather in Paris?"
        }
      ]
    },
    "stream_mode": "values"
  }'
Or using a Python script:
# test_agent.py
from agent import graph
from langchain_core.messages import HumanMessage

# Test the agent
def test_agent():
    # Test weather query
    result = graph.invoke({
        "messages": [HumanMessage(content="What's the weather like in London?")]
    })

    print("Weather Query Result:")
    for message in result["messages"]:
        print(f"{type(message).__name__}: {message.content}")

    print("\n" + "="*50 + "\n")

    # Test search query
    result = graph.invoke({
        "messages": [HumanMessage(content="Search for information about LangGraph")]
    })

    print("Search Query Result:")
    for message in result["messages"]:
        print(f"{type(message).__name__}: {message.content}")

if __name__ == "__main__":
    test_agent()
LangGrap Studio
LangGraph Studio is a specialised visual development environment and debugging tool designed specifically for building, testing, and optimising LangGraph applications locally.
It provides
-
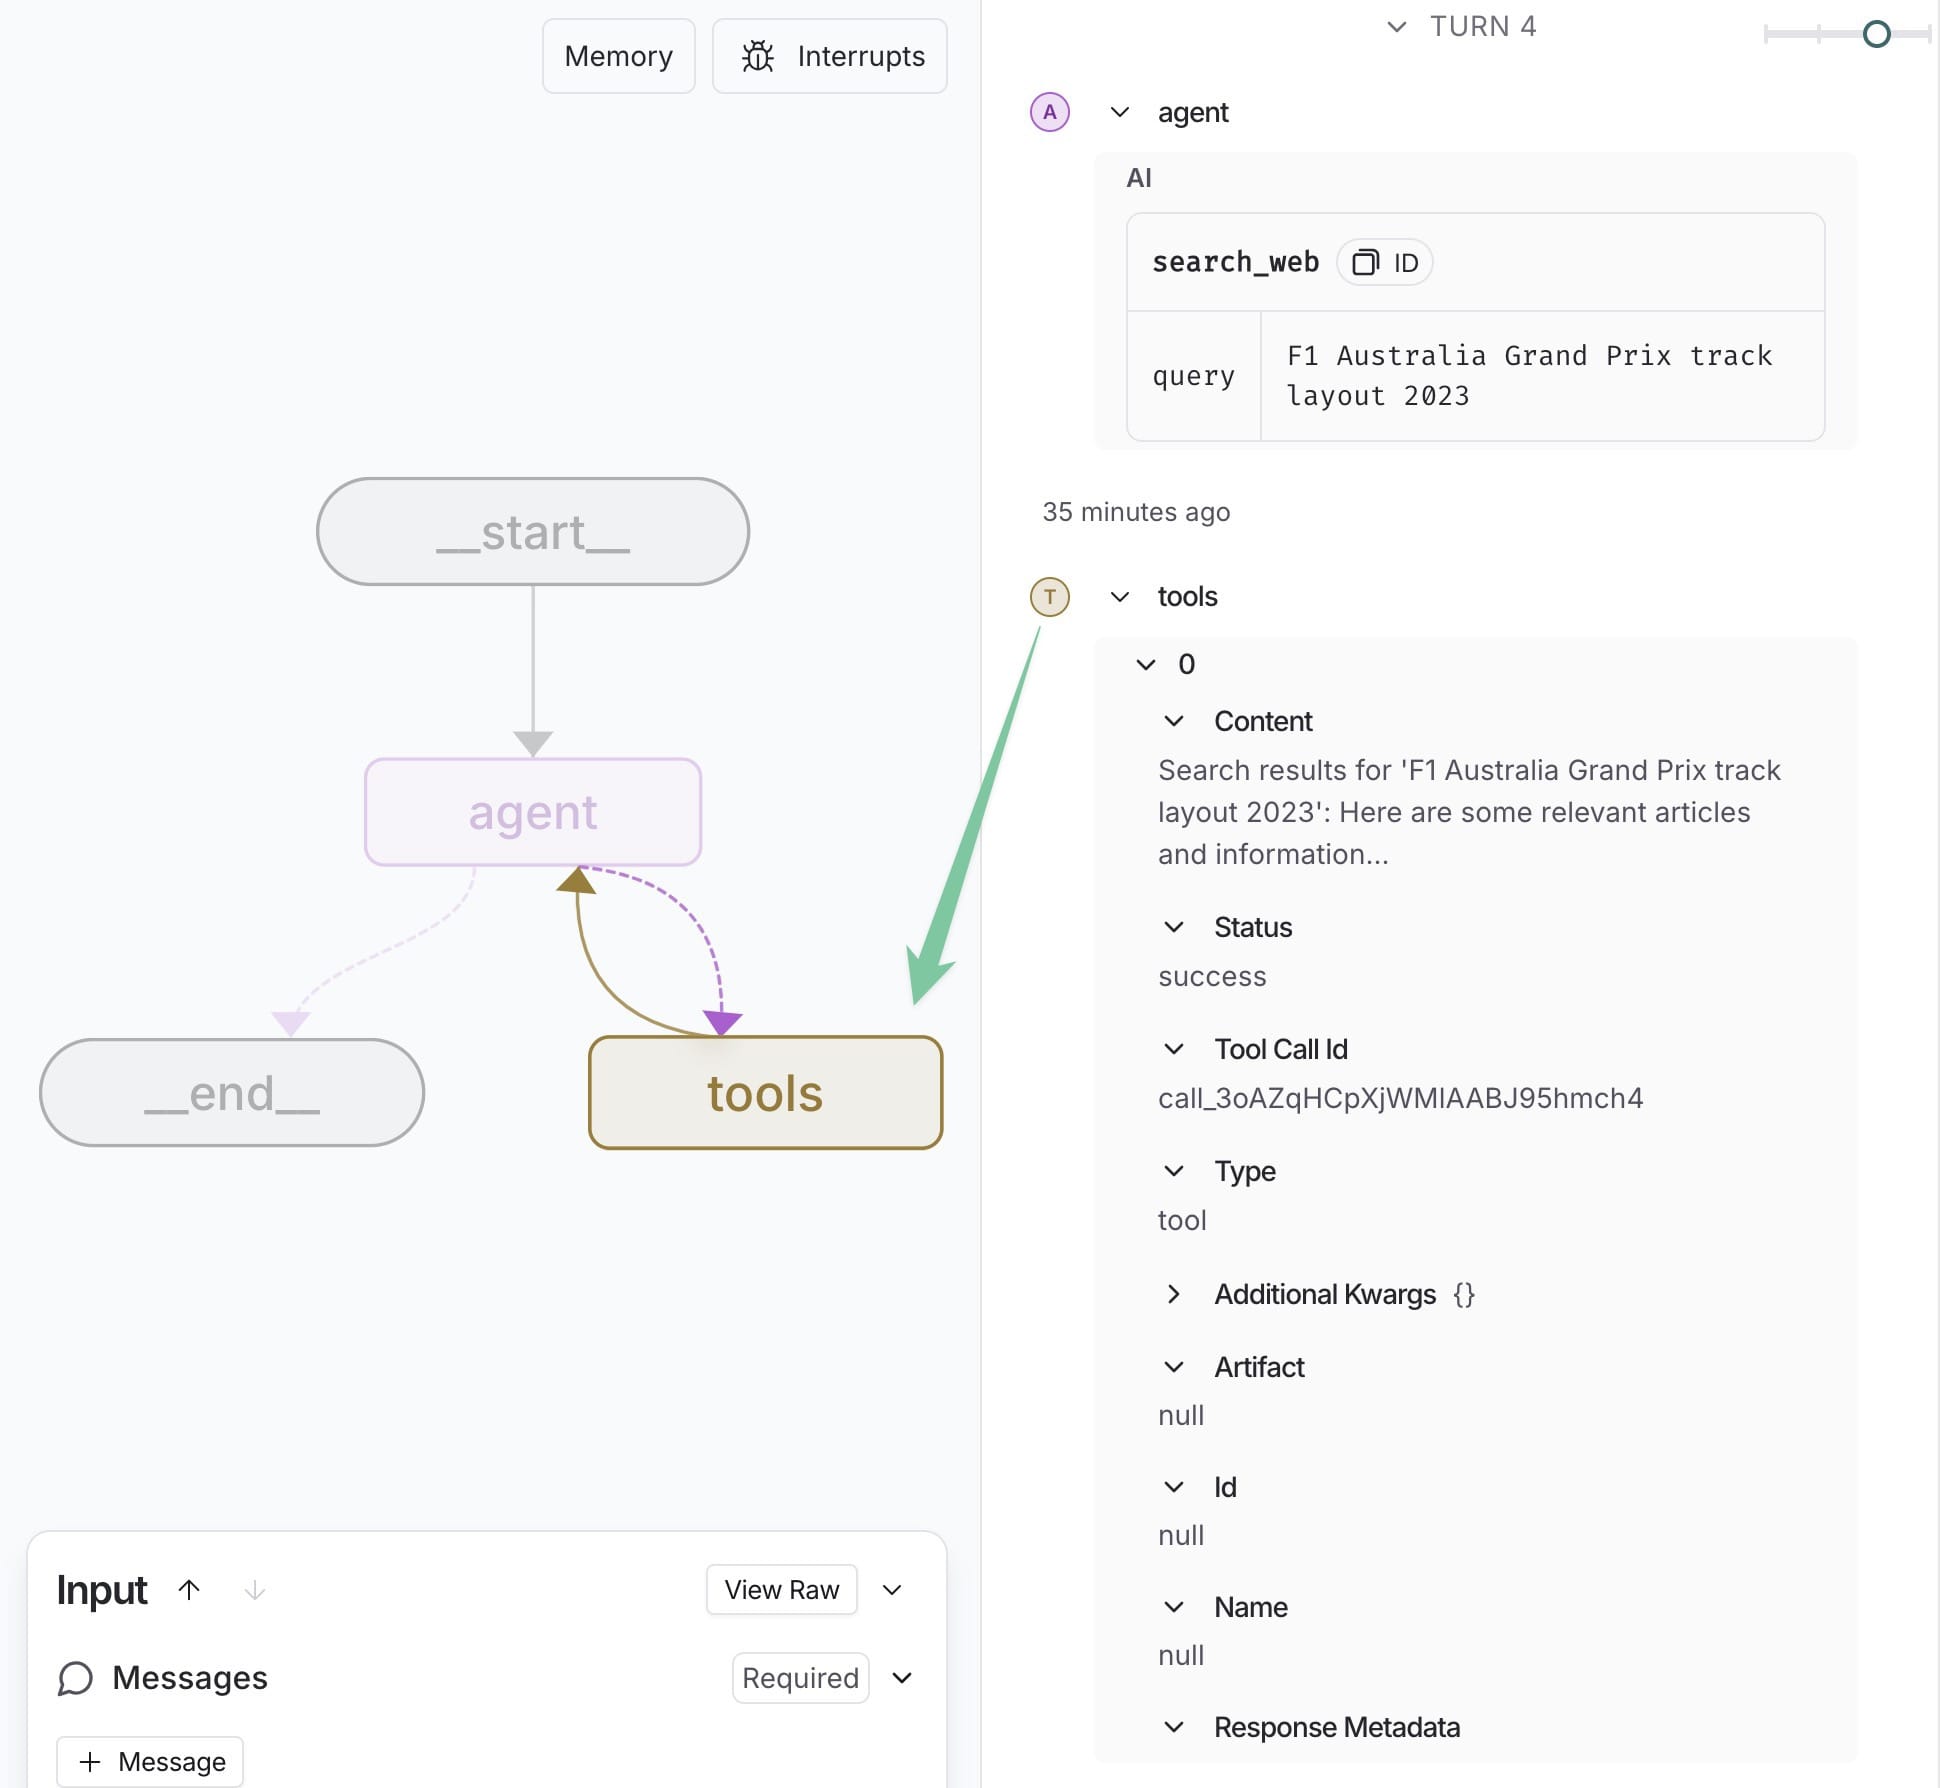
An interactive web-based interface1 that allows developers to visualise their agent workflows as graphs, watch real-time execution flows, and debug complex multi-step reasoning processes by showing exactly which nodes are traversed, what intermediate states are created, and how tools are being called.
-
The Studio integrates seamlessly with LangSmith for comprehensive tracing, evaluation, and prompt engineering, while offering two distinct modes:
-
Graph mode for detailed technical debugging with full feature access to execution details, and
-
Chat mode for simpler business-user testing of chat-specific agents.
-
-
When running locally via the
langgraph devcommand, Studio connects to your local development server. It provides immediate visual feedback as you modify your code, making it invaluable for prototyping sophisticated AI agents, understanding their decision-making processes, and iteratively improving their performance through visual insights into state management, tool usage, and conversation flows.
The development server will provide three key URLs:
-
the API endpoint,
-
documentation,
-
and most importantly, the LangGraph Studio Web UI,
where you can visually interact2 with and debug your agent.
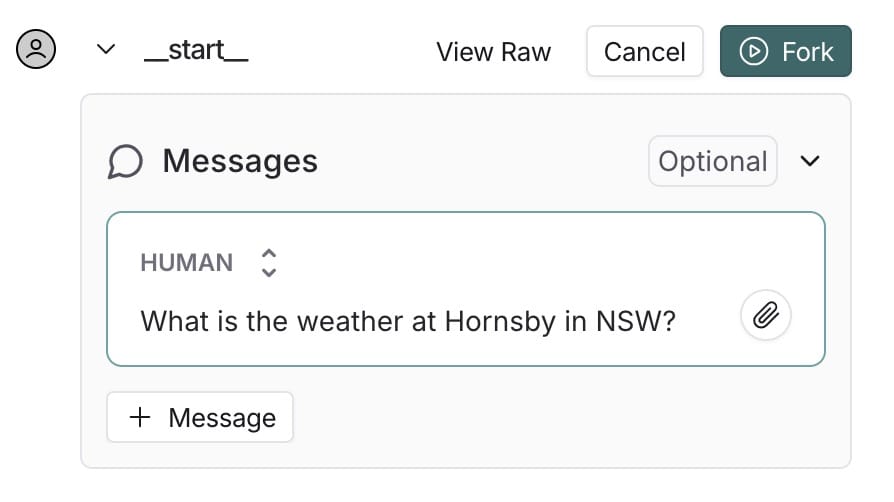
You can add a checkpoint before the debugging:

In this case human will be in the loop before get into the tools.
Even you can fork your query as follows.
There are more festures in this real-time visual debugging and editing 3 tool.